> ## Documentation Index
> Fetch the complete documentation index at: https://tomee-mintlify-99ed5a6d.mintlify.site/llms.txt
> Use this file to discover all available pages before exploring further.
# AWS Route 53 and CloudFront
> Deploy your Mintlify documentation at a subpath on AWS using Route 53 for DNS routing and CloudFront as a CDN with Lambda@Edge functions.
To host your documentation at a subpath such as `yoursite.com/docs` using AWS Route 53 and CloudFront, you must configure your DNS provider to point to your CloudFront distribution.
Before configuring AWS, set your base path in your dashboard:
1. Navigate to the [Custom domain setup](https://app.mintlify.com/settings/deployment/custom-domain) page in your dashboard.
2. Enable the **Host at** toggle.
3. Enter your domain.
4. Enter your base path. For example, `/docs` or `/help`.
5. Click **Add domain**.
## Overview
The following examples use the `/docs` base path. If you use a different base path, replace `/docs` with your base path.
Route traffic to these paths with a Cache Policy of **CachingDisabled**:
* `/.well-known/acme-challenge/*` - Required for Let's Encrypt certificate verification
* `/.well-known/vercel/*` - Required for domain verification
* `/docs/*` - Required for subpath routing
* `/docs/` - Required for subpath routing
Route traffic to these paths with a Cache Policy of **CachingEnabled**:
* `/mintlify-assets/_next/static/*`
* `Default (*)` - Your website's landing page
All Behaviors must have an **origin request policy** of `AllViewerExceptHostHeader`.
The behaviors for your subpath must allow all HTTP methods. CloudFront only allows `GET` and `HEAD` requests by default, which blocks the `POST` requests that Mintlify uses for analytics and other interactive features.
 ## Create CloudFront distribution
1. Navigate to [CloudFront](https://aws.amazon.com/cloudfront) inside the AWS console.
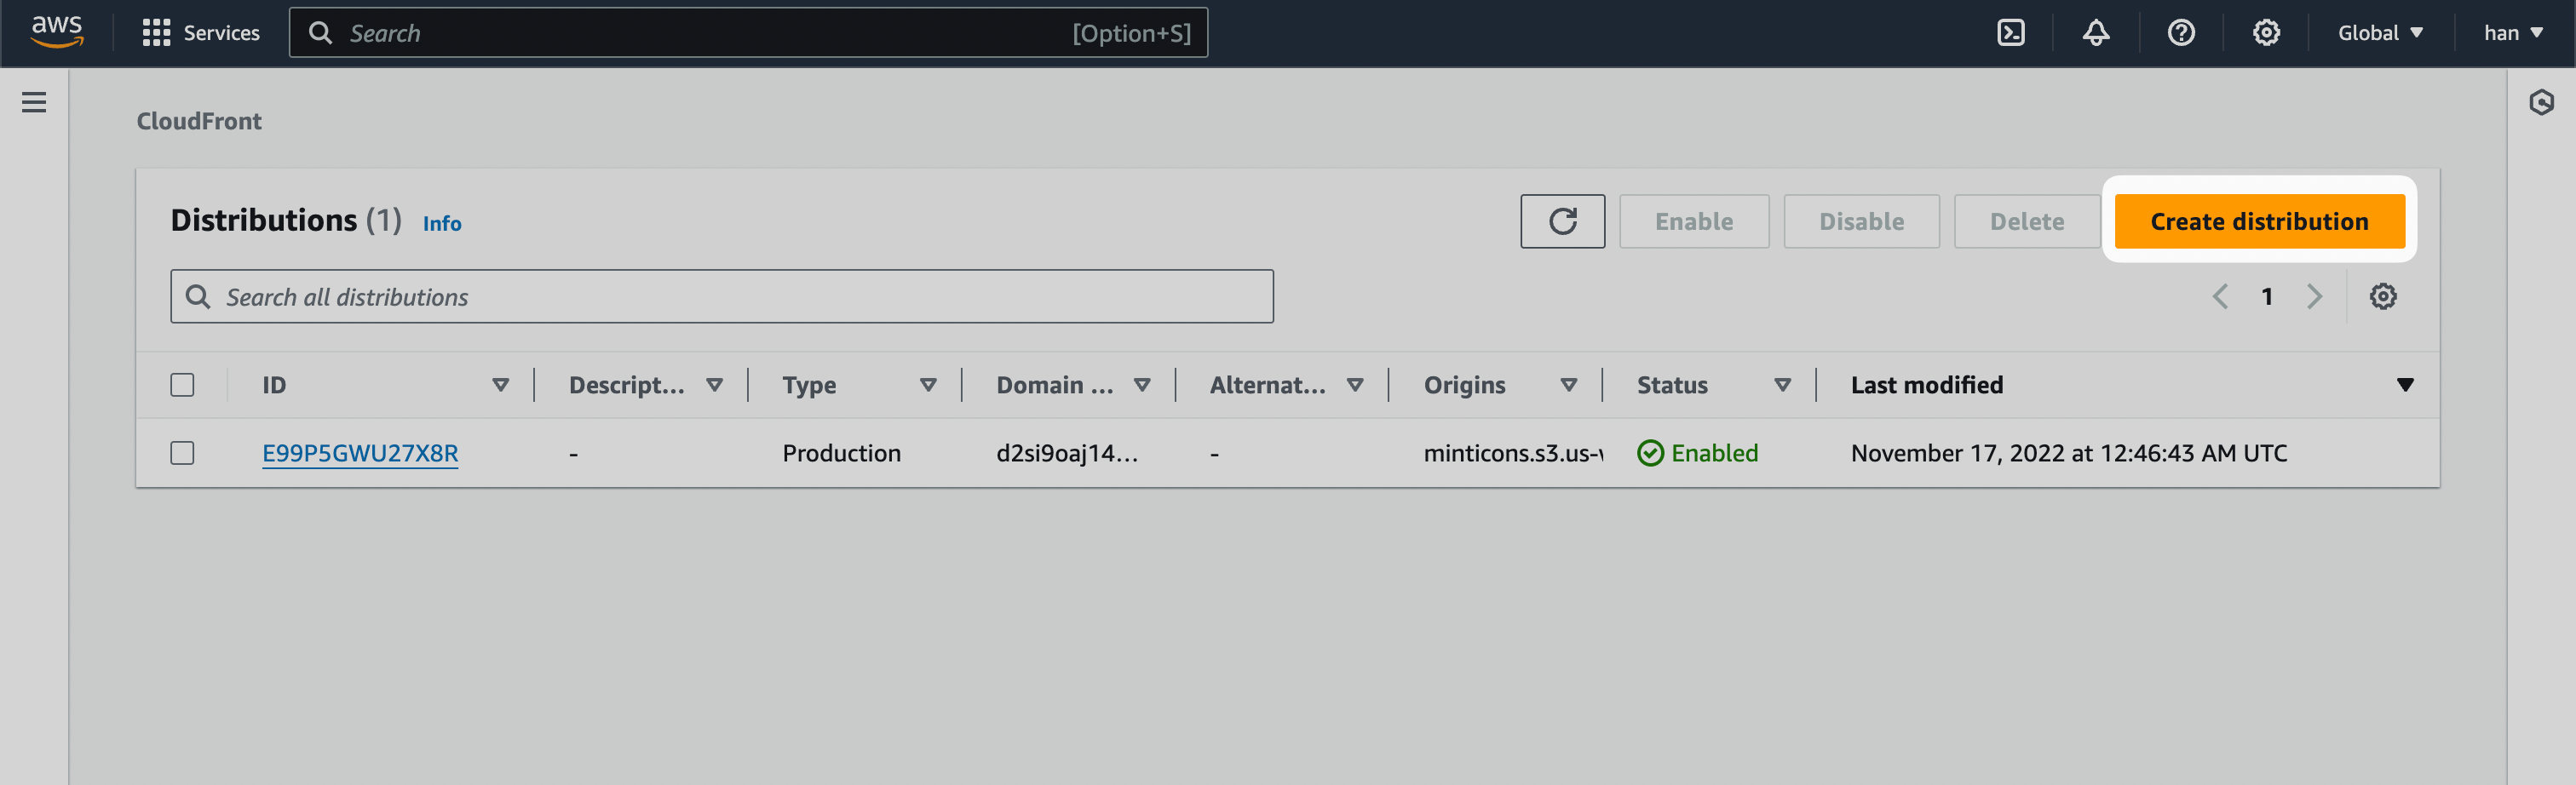
2. Click **Create distribution**.
## Create CloudFront distribution
1. Navigate to [CloudFront](https://aws.amazon.com/cloudfront) inside the AWS console.
2. Click **Create distribution**.
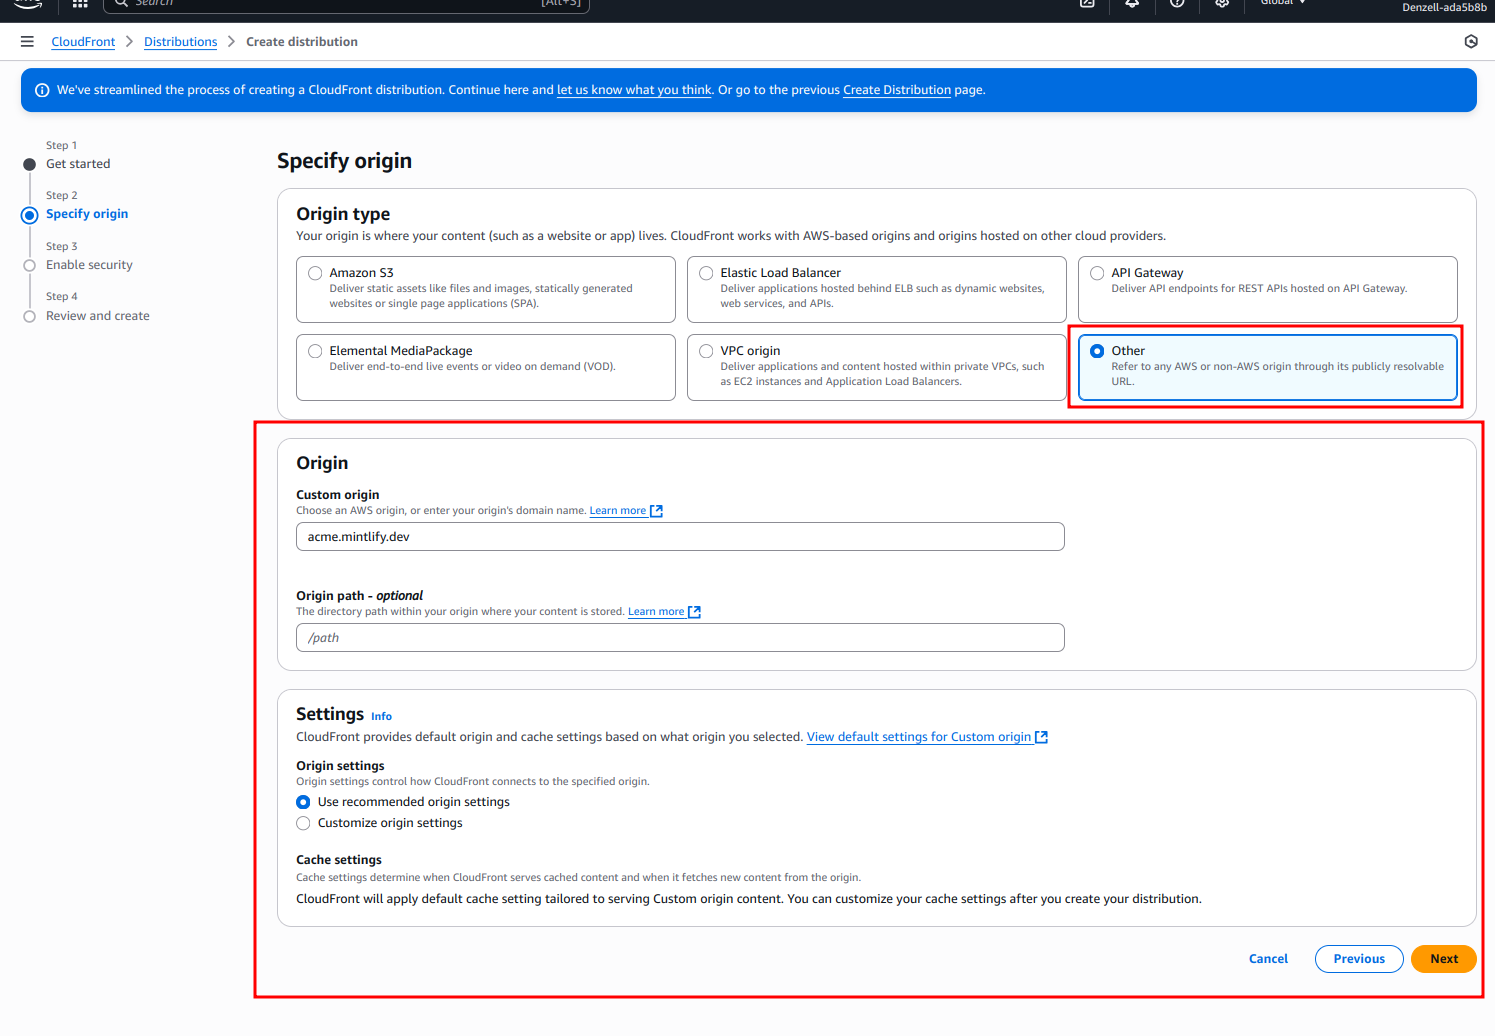
 3. For the Origin domain, input `[SUBDOMAIN].mintlify.site` where `[SUBDOMAIN]` is your project's unique subdomain.
 4. For "Web Application Firewall (WAF)," enable security protections.
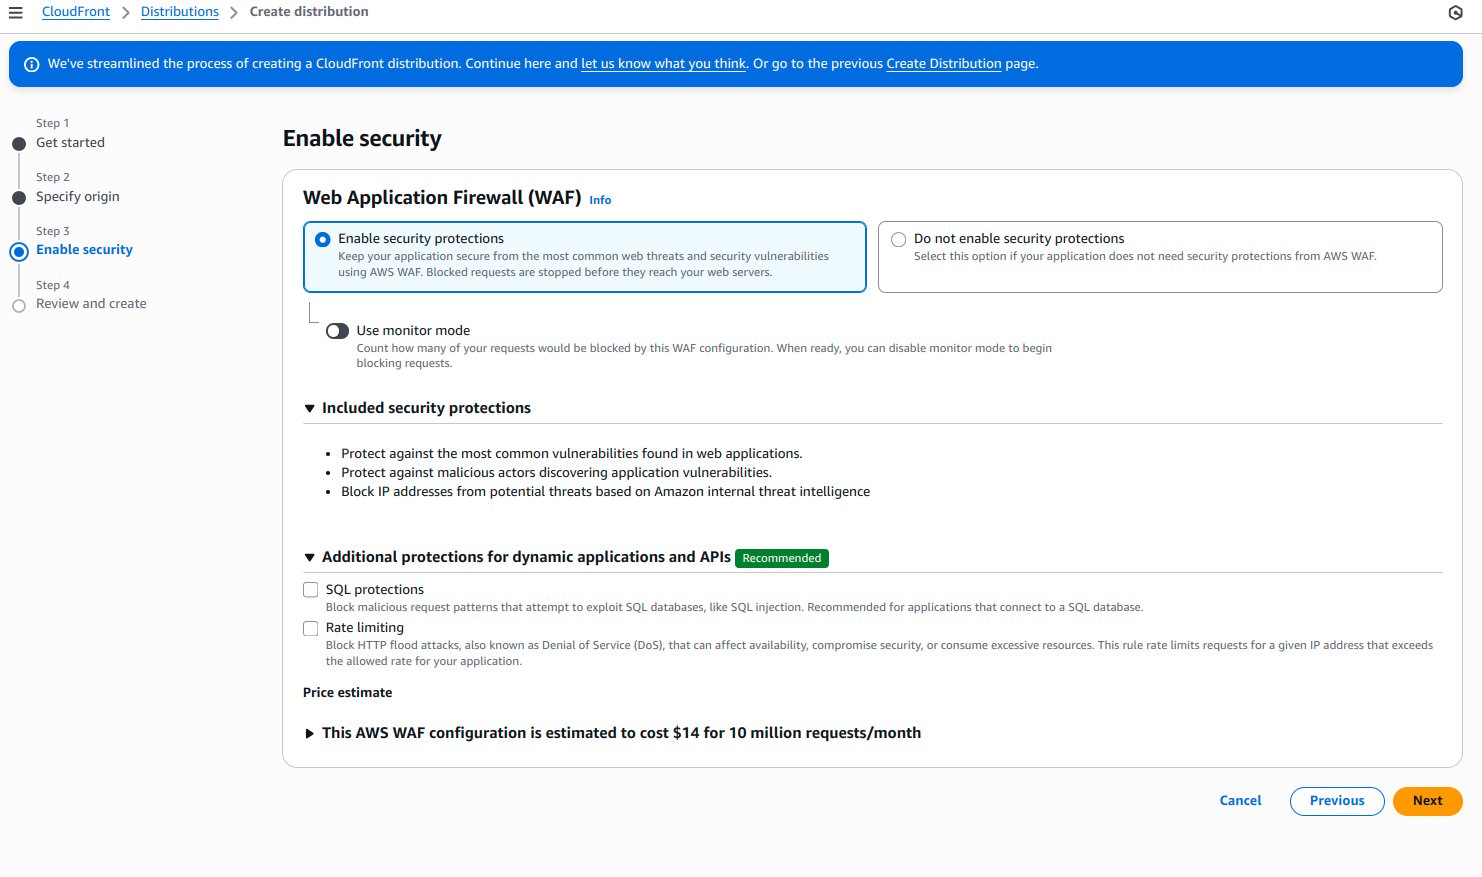 WAF rules can block the `POST` requests that Mintlify uses for analytics and other interactive features. If analytics stop appearing in your dashboard after enabling WAF, check your WAF logs for blocked requests to paths under `/docs/_mintlify/`.
5. The remaining settings should be default.
6. Click **Create distribution**.
## Add default origin
1. After creating the distribution, navigate to the "Origins" tab.
WAF rules can block the `POST` requests that Mintlify uses for analytics and other interactive features. If analytics stop appearing in your dashboard after enabling WAF, check your WAF logs for blocked requests to paths under `/docs/_mintlify/`.
5. The remaining settings should be default.
6. Click **Create distribution**.
## Add default origin
1. After creating the distribution, navigate to the "Origins" tab.
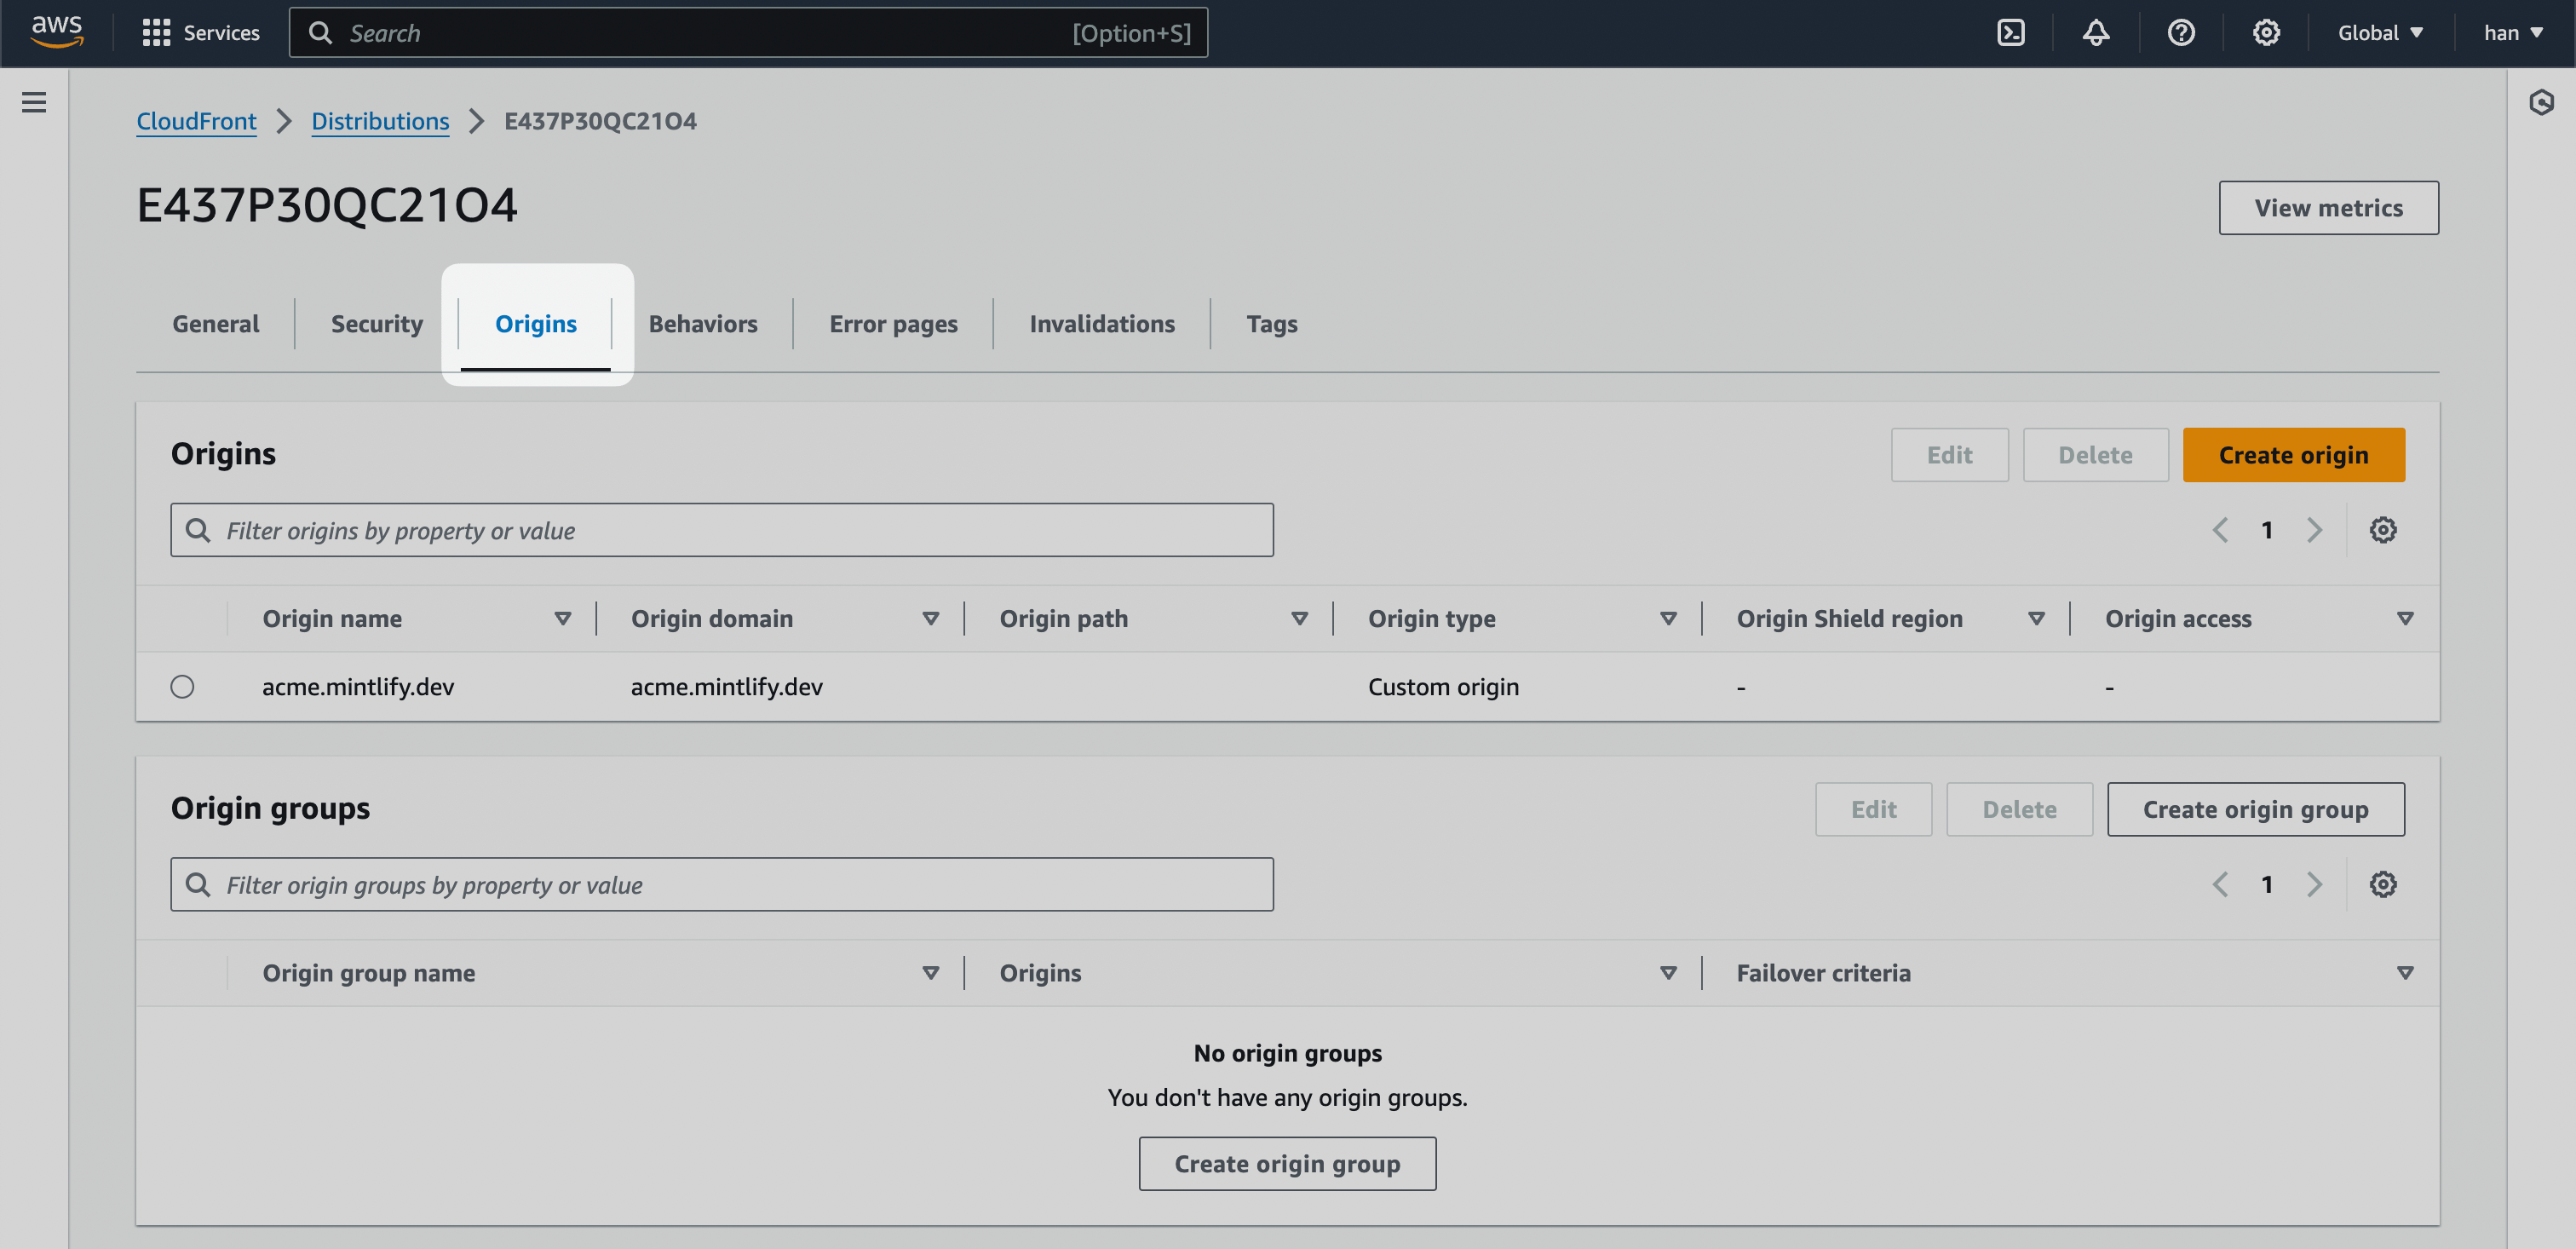 2. Find your staging URL that mirrors the main domain. This varies depending on your landing page host. For example, the Mintlify staging URL is [mintlify-landing-page.vercel.app](https://mintlify-landing-page.vercel.app).
If Webflow hosts your landing page, use Webflow's staging URL. It would look like `.webflow.io`.
If you use Vercel, use the `.vercel.app` domain available for every project.
3. Create a new Origin and add your staging URL as the "Origin domain."
2. Find your staging URL that mirrors the main domain. This varies depending on your landing page host. For example, the Mintlify staging URL is [mintlify-landing-page.vercel.app](https://mintlify-landing-page.vercel.app).
If Webflow hosts your landing page, use Webflow's staging URL. It would look like `.webflow.io`.
If you use Vercel, use the `.vercel.app` domain available for every project.
3. Create a new Origin and add your staging URL as the "Origin domain."
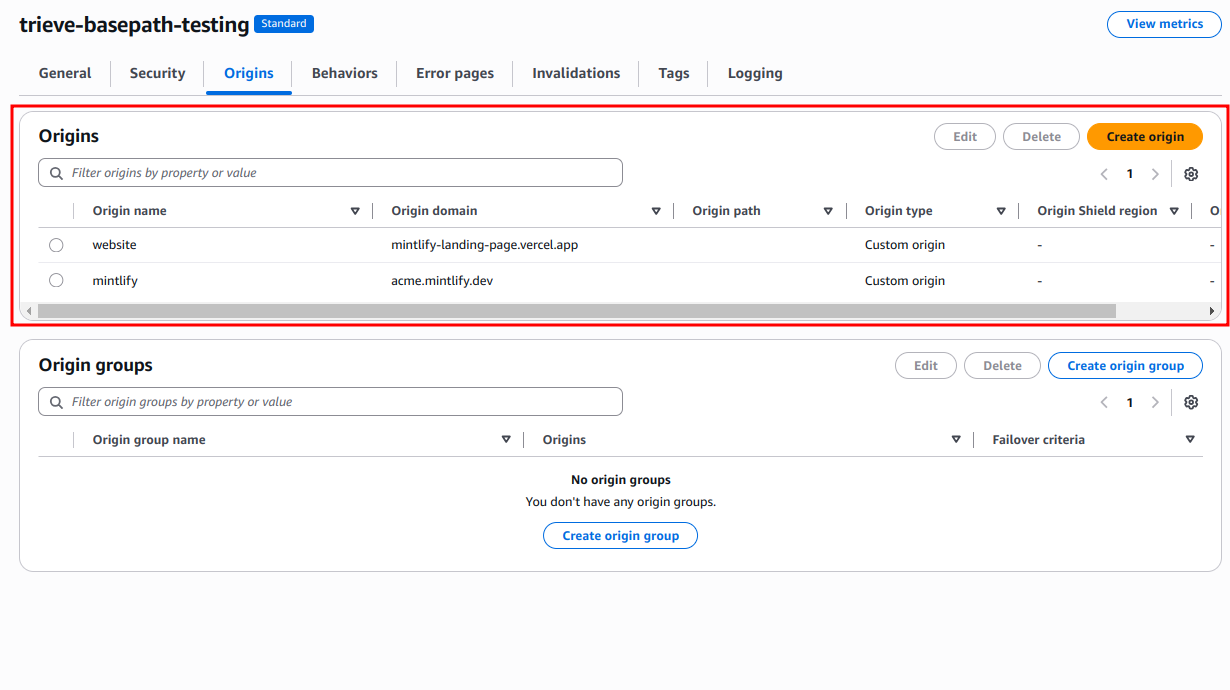
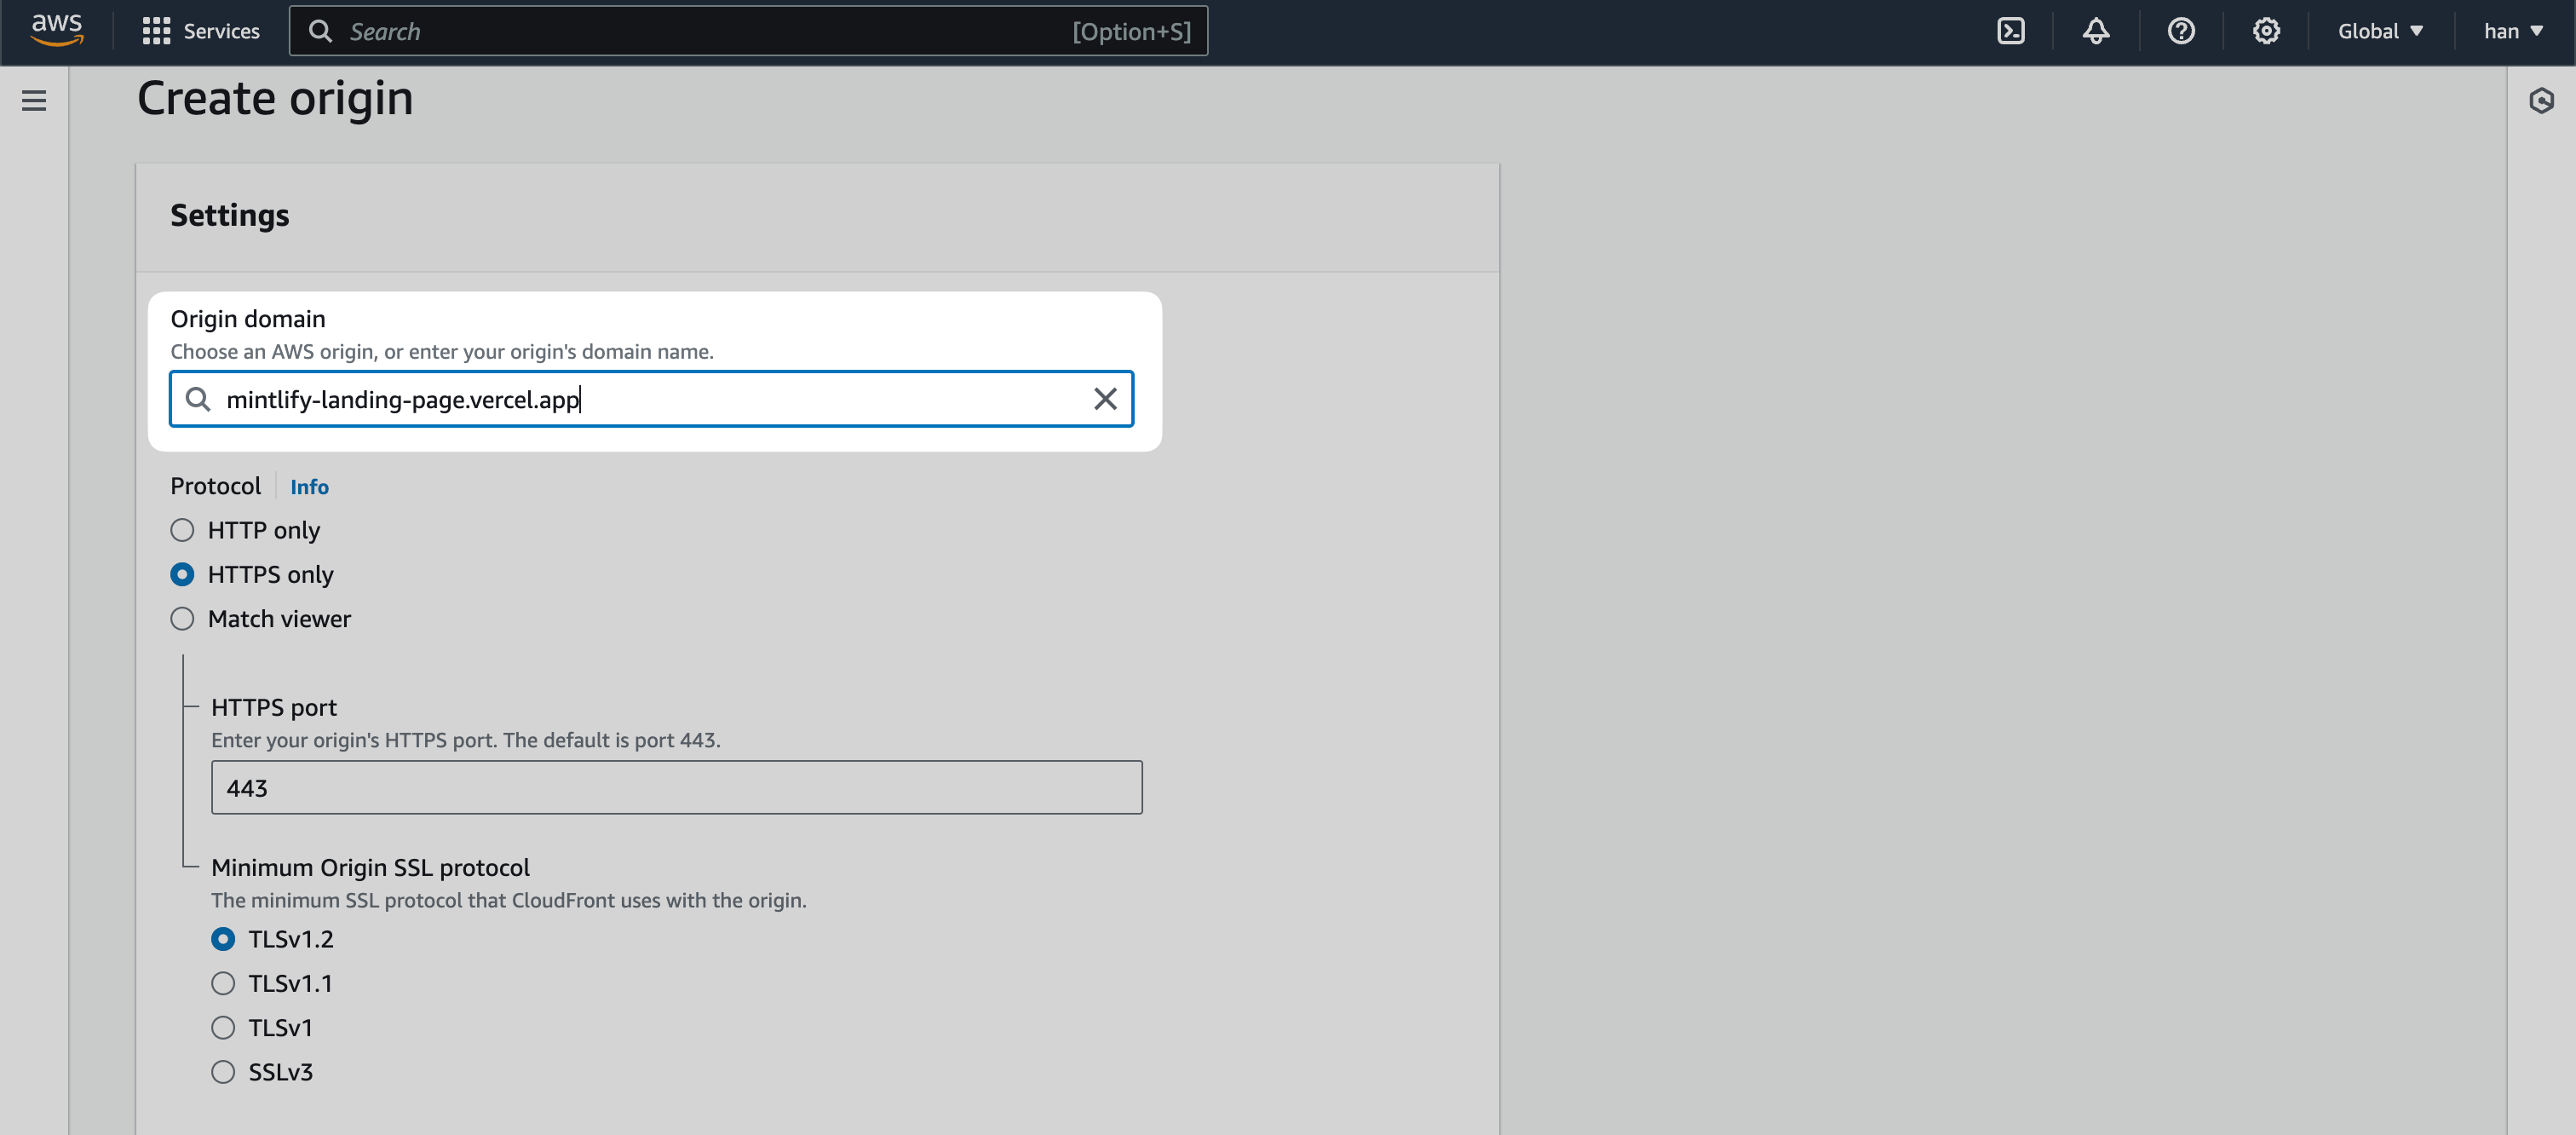 You should now have two Origins: one with `[SUBDOMAIN].mintlify.site` and another with your staging URL.
 ## Set behaviors
Behaviors in CloudFront enable control over the subpath logic. At a high level, you create the following logic:
* **If a user lands on your custom subpath**, go to `[SUBDOMAIN].mintlify.site`.
* **If a user lands on any other page**, go to the current landing page.
1. Navigate to the "Behaviors" tab of your CloudFront distribution.
## Set behaviors
Behaviors in CloudFront enable control over the subpath logic. At a high level, you create the following logic:
* **If a user lands on your custom subpath**, go to `[SUBDOMAIN].mintlify.site`.
* **If a user lands on any other page**, go to the current landing page.
1. Navigate to the "Behaviors" tab of your CloudFront distribution.
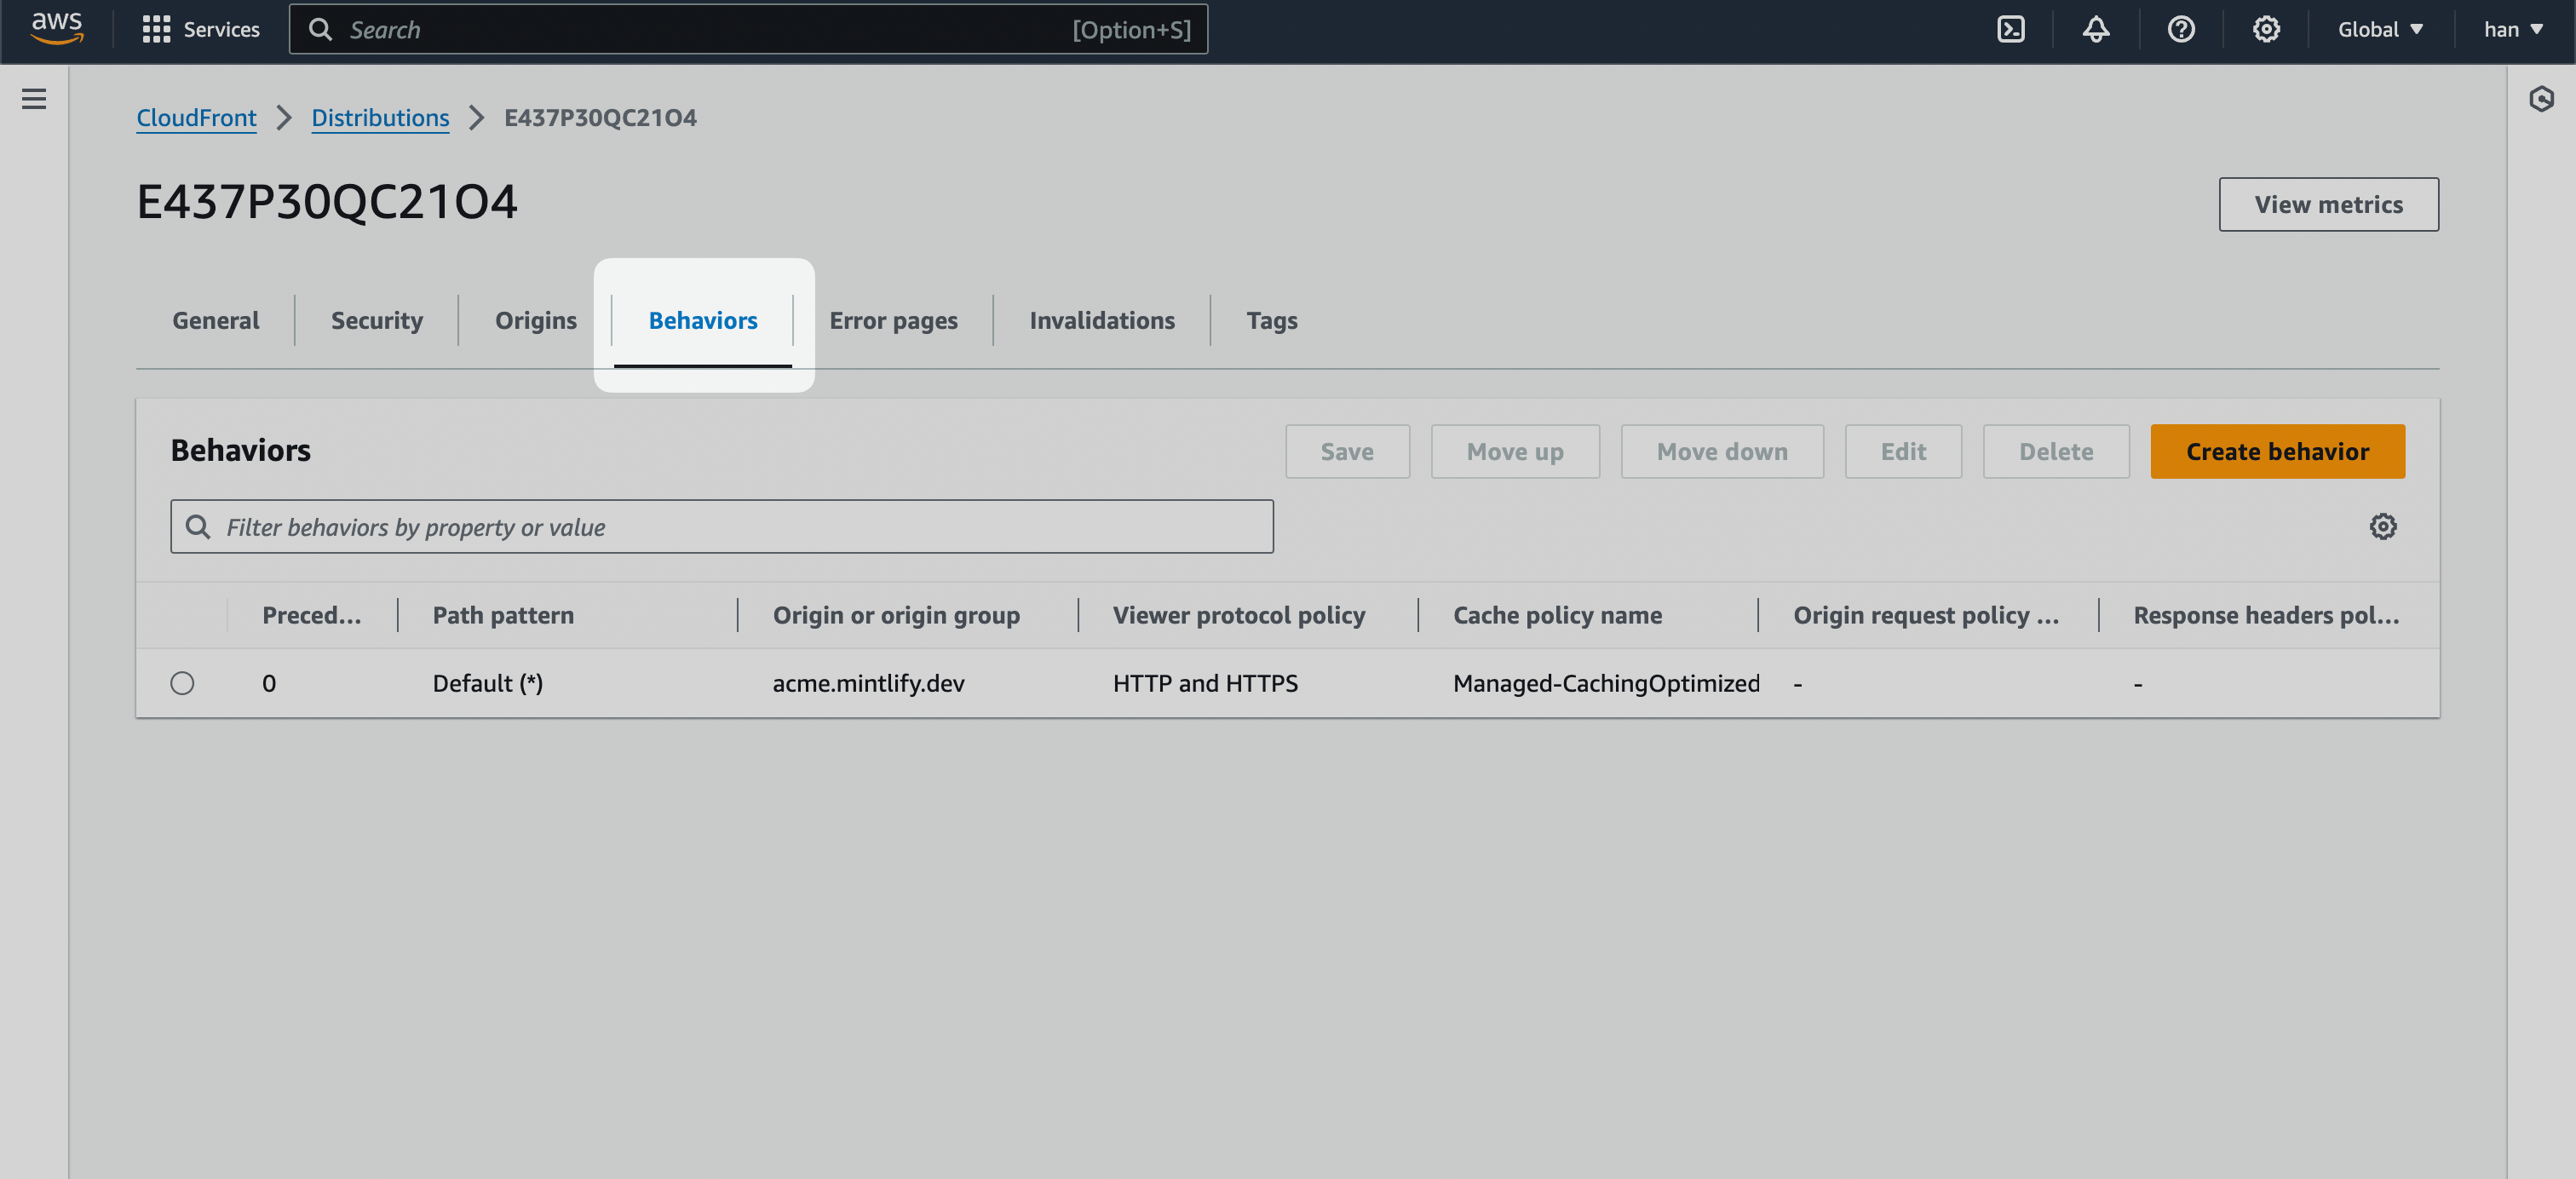 2. Click the **Create behavior** button and create the following behaviors.
### `/.well-known/*`
Create behaviors for Vercel domain verification paths with a **Path pattern** of `/.well-known/*` and set **Origin and origin groups** to your docs URL.
For "Cache policy," select **CachingDisabled** to ensure these verification requests pass through without caching.
2. Click the **Create behavior** button and create the following behaviors.
### `/.well-known/*`
Create behaviors for Vercel domain verification paths with a **Path pattern** of `/.well-known/*` and set **Origin and origin groups** to your docs URL.
For "Cache policy," select **CachingDisabled** to ensure these verification requests pass through without caching.
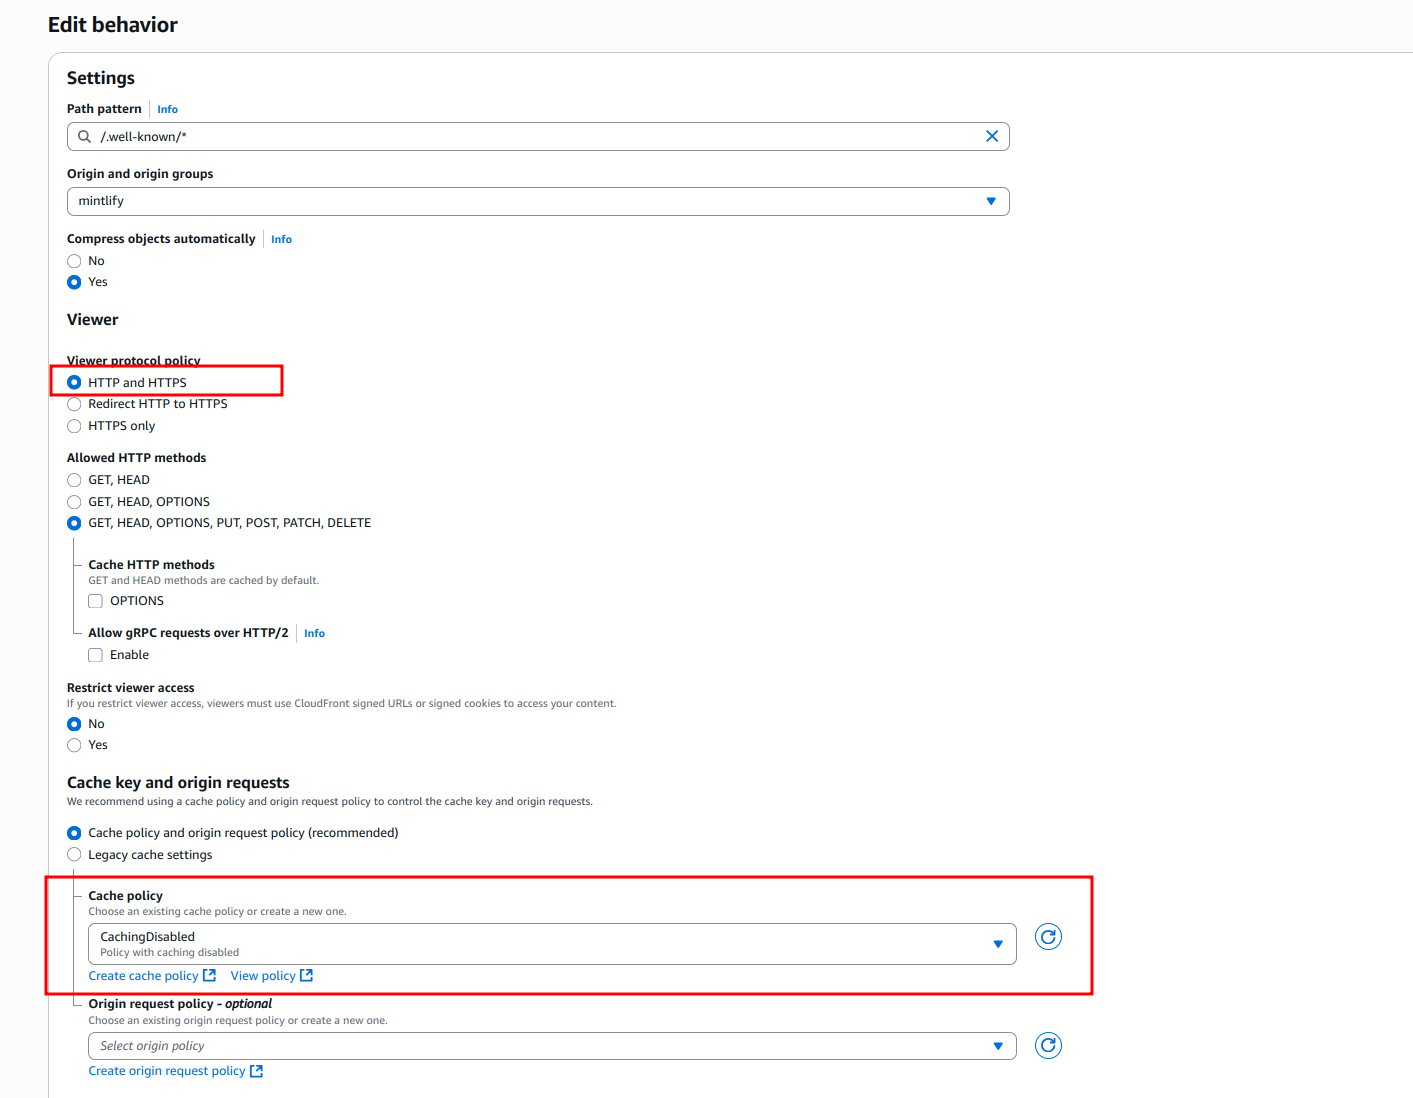 If `.well-known/*` is too generic, you can narrow it down to 2 behaviors at a minimum for Vercel:
* `/.well-known/vercel/*` - Required for Vercel domain verification
* `/.well-known/acme-challenge/*` - Required for Let's Encrypt certificate verification
### Your subpath
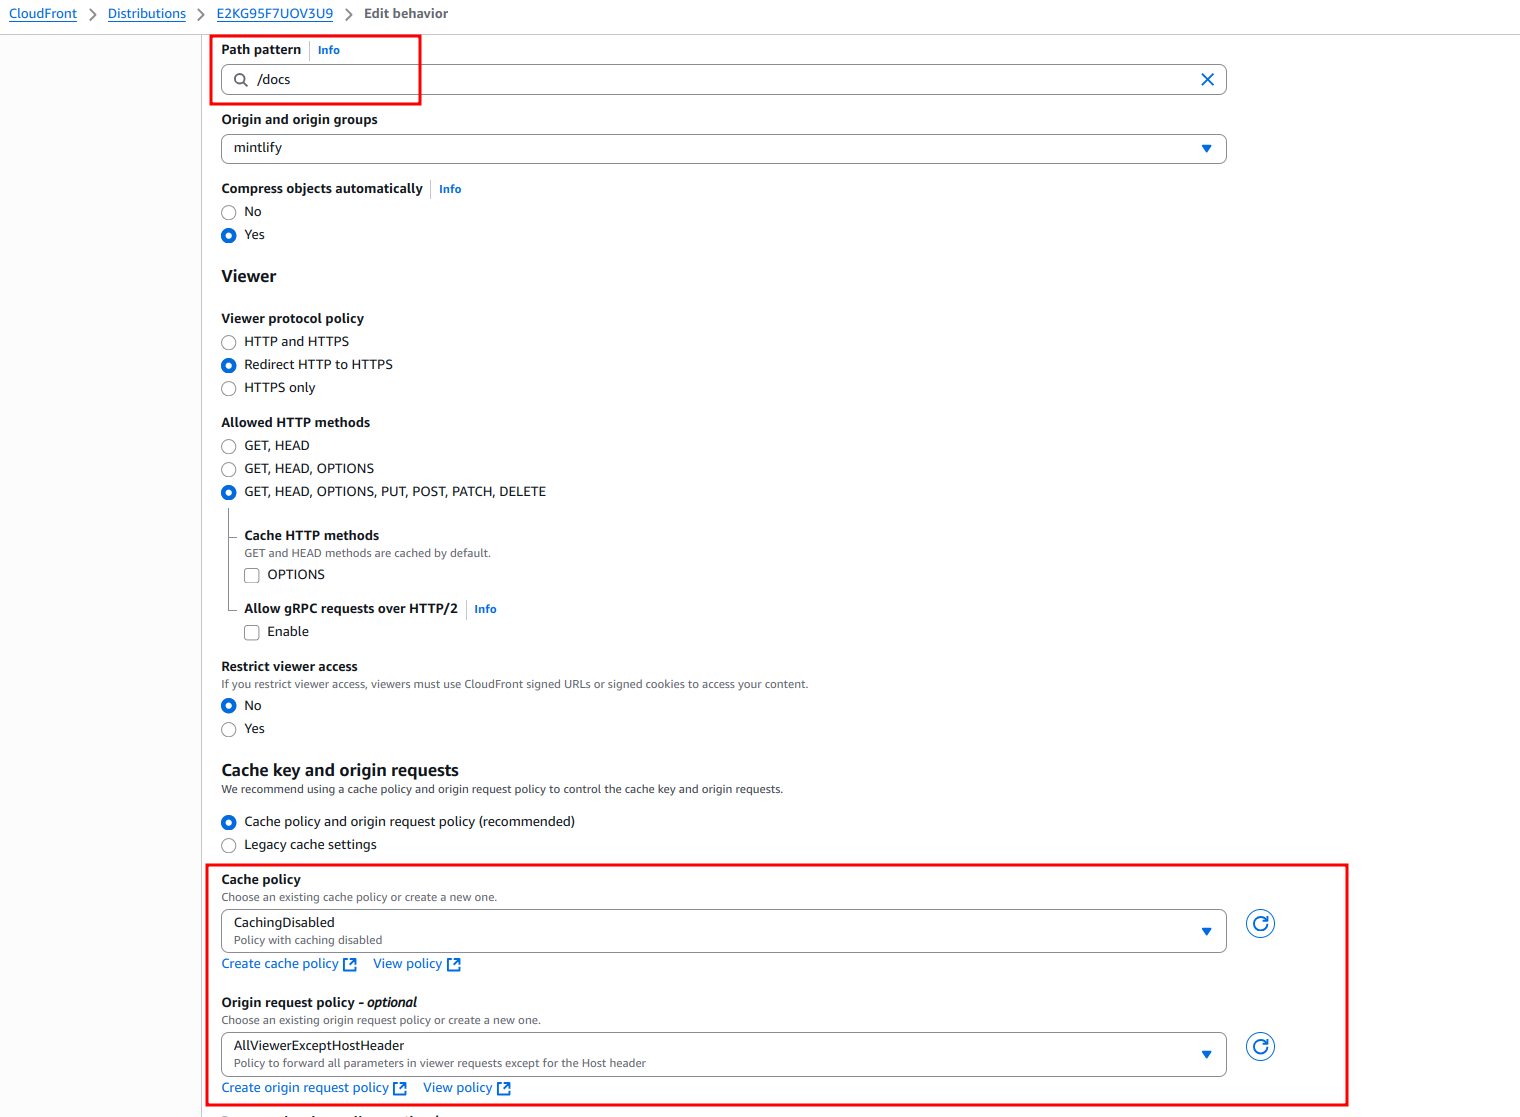
Create a behavior with a **Path pattern** of your chosen subpath, for example `/docs`, with **Origin and origin groups** pointing to the `.mintlify.site` URL (for example, `acme.mintlify.site`).
* Set "Cache policy" to **CachingDisabled**.
* Set "Origin request policy" to **AllViewerExceptHostHeader**.
* Set "Viewer protocol policy" to **Redirect HTTP to HTTPS**.
* Set "Allowed HTTP methods" to **GET, HEAD, OPTIONS, PUT, POST, PATCH, DELETE**.
CloudFront only allows `GET` and `HEAD` requests by default. If you don't allow all HTTP methods, CloudFront rejects the `POST` requests that Mintlify uses for analytics, and your dashboard won't show any page views even though your docs load normally.
If `.well-known/*` is too generic, you can narrow it down to 2 behaviors at a minimum for Vercel:
* `/.well-known/vercel/*` - Required for Vercel domain verification
* `/.well-known/acme-challenge/*` - Required for Let's Encrypt certificate verification
### Your subpath
Create a behavior with a **Path pattern** of your chosen subpath, for example `/docs`, with **Origin and origin groups** pointing to the `.mintlify.site` URL (for example, `acme.mintlify.site`).
* Set "Cache policy" to **CachingDisabled**.
* Set "Origin request policy" to **AllViewerExceptHostHeader**.
* Set "Viewer protocol policy" to **Redirect HTTP to HTTPS**.
* Set "Allowed HTTP methods" to **GET, HEAD, OPTIONS, PUT, POST, PATCH, DELETE**.
CloudFront only allows `GET` and `HEAD` requests by default. If you don't allow all HTTP methods, CloudFront rejects the `POST` requests that Mintlify uses for analytics, and your dashboard won't show any page views even though your docs load normally.
 ### Your subpath with wildcard
Create a behavior with a **Path pattern** of your chosen subpath followed by `/*`, for example `/docs/*`, and **Origin and origin groups** pointing to the same `.mintlify.site` URL.
These settings should exactly match your base subpath behavior, with the exception of the **Path pattern**.
* Set "Cache policy" to **CachingDisabled**.
* Set "Origin request policy" to **AllViewerExceptHostHeader**.
* Set "Viewer protocol policy" to **Redirect HTTP to HTTPS**.
* Set "Allowed HTTP methods" to **GET, HEAD, OPTIONS, PUT, POST, PATCH, DELETE**.
### `/mintlify-assets/_next/static/*`
* Set "Cache policy" to **CachingOptimized**.
* Set "Origin request policy" to **AllViewerExceptHostHeader**.
* Set "Viewer protocol policy" to **Redirect HTTP to HTTPS**.
### `Default (*)`
Edit the `Default (*)` behavior.
### Your subpath with wildcard
Create a behavior with a **Path pattern** of your chosen subpath followed by `/*`, for example `/docs/*`, and **Origin and origin groups** pointing to the same `.mintlify.site` URL.
These settings should exactly match your base subpath behavior, with the exception of the **Path pattern**.
* Set "Cache policy" to **CachingDisabled**.
* Set "Origin request policy" to **AllViewerExceptHostHeader**.
* Set "Viewer protocol policy" to **Redirect HTTP to HTTPS**.
* Set "Allowed HTTP methods" to **GET, HEAD, OPTIONS, PUT, POST, PATCH, DELETE**.
### `/mintlify-assets/_next/static/*`
* Set "Cache policy" to **CachingOptimized**.
* Set "Origin request policy" to **AllViewerExceptHostHeader**.
* Set "Viewer protocol policy" to **Redirect HTTP to HTTPS**.
### `Default (*)`
Edit the `Default (*)` behavior.
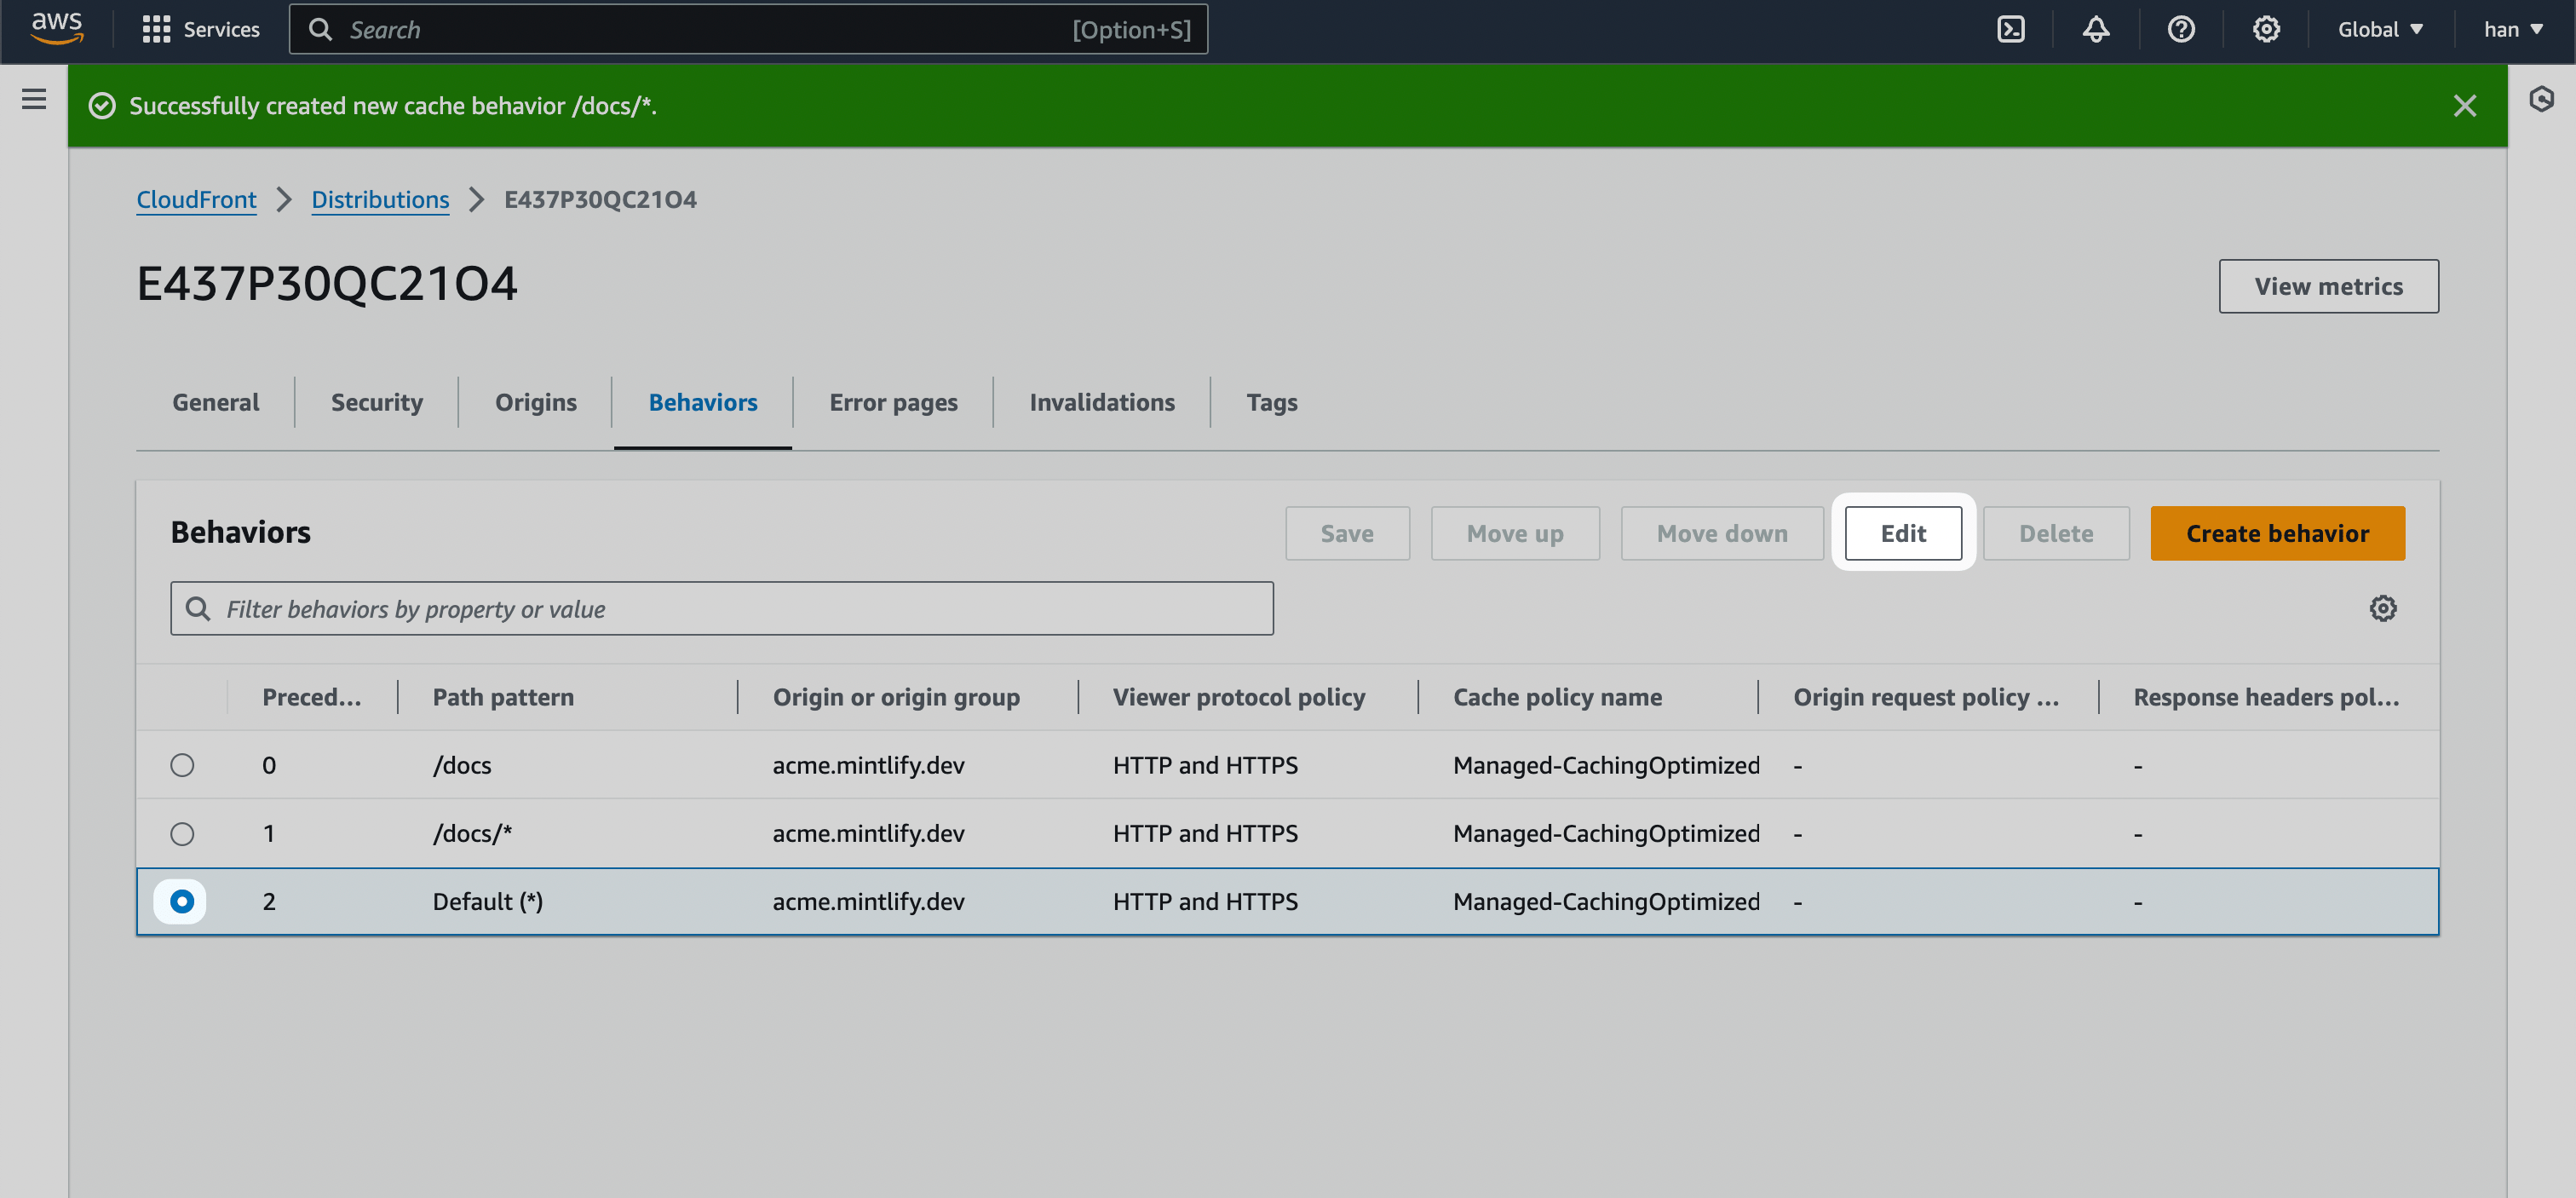 1. Change the default behavior's **Origin and origin groups** to the staging URL (for example, `mintlify-landing-page.vercel.app`).
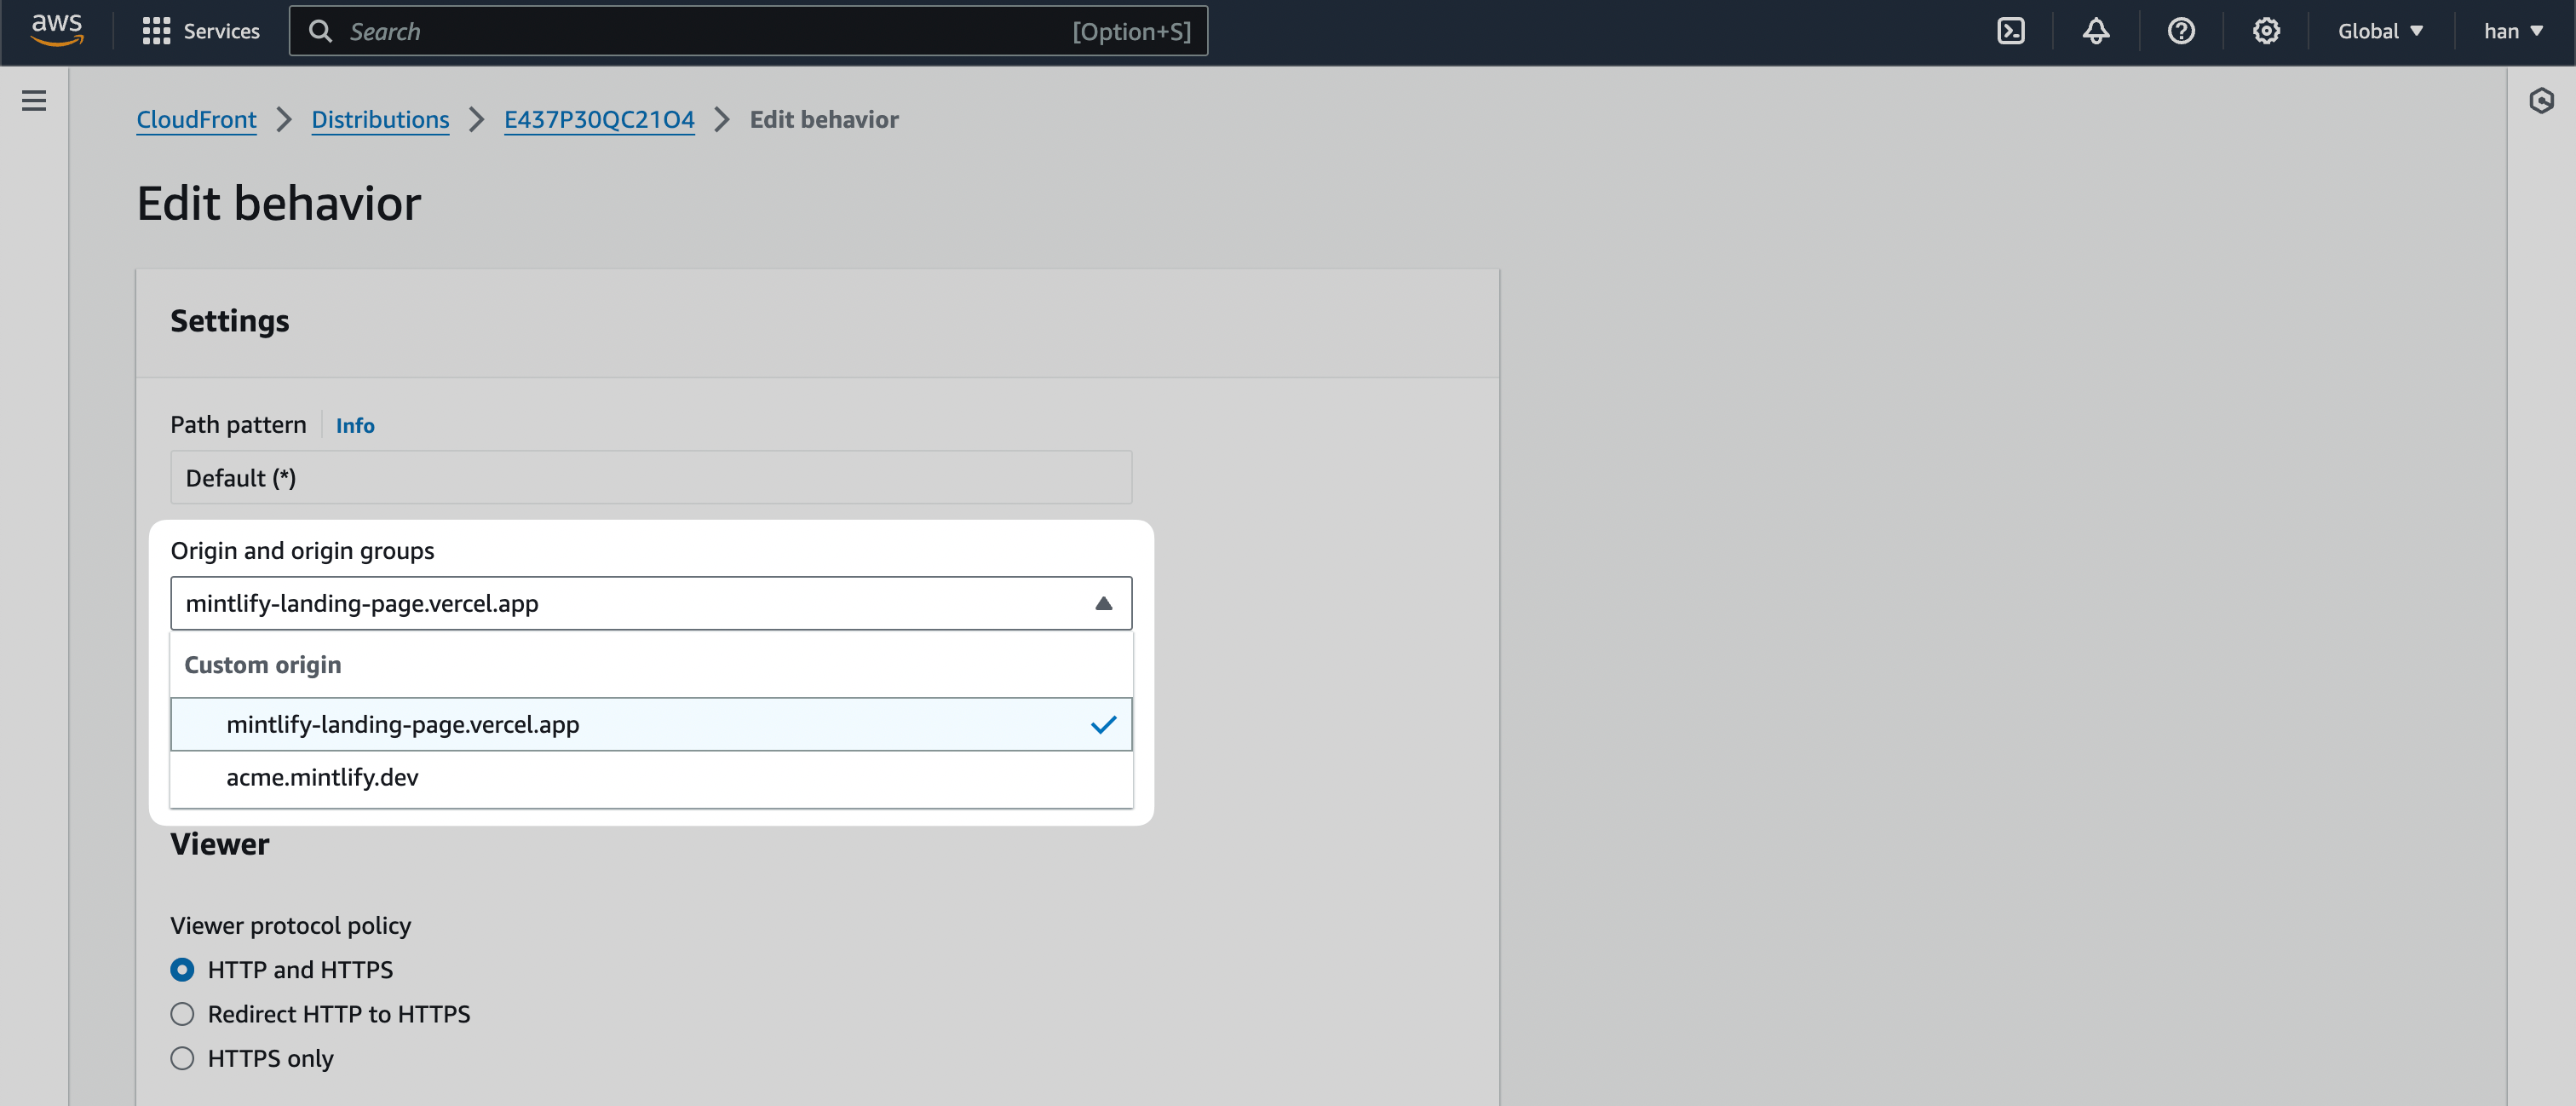 2. Click **Save changes**.
### Check that you set up behaviors correctly
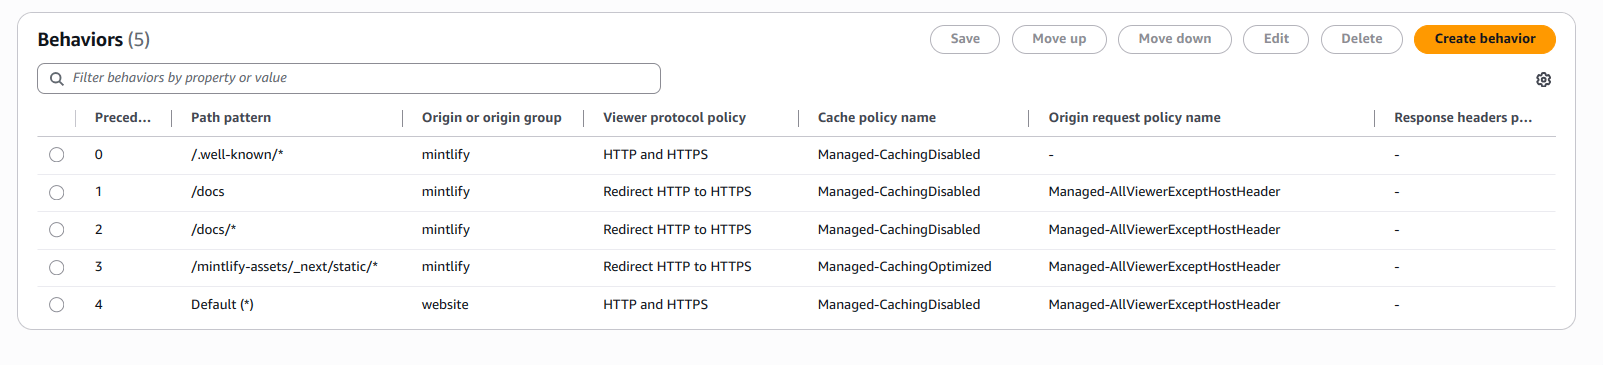
If you follow the preceding steps, your behaviors should look like this:
## Preview distribution
To test your distribution, go to the "General" tab and visit the **Distribution domain name** URL.
2. Click **Save changes**.
### Check that you set up behaviors correctly
If you follow the preceding steps, your behaviors should look like this:
## Preview distribution
To test your distribution, go to the "General" tab and visit the **Distribution domain name** URL.
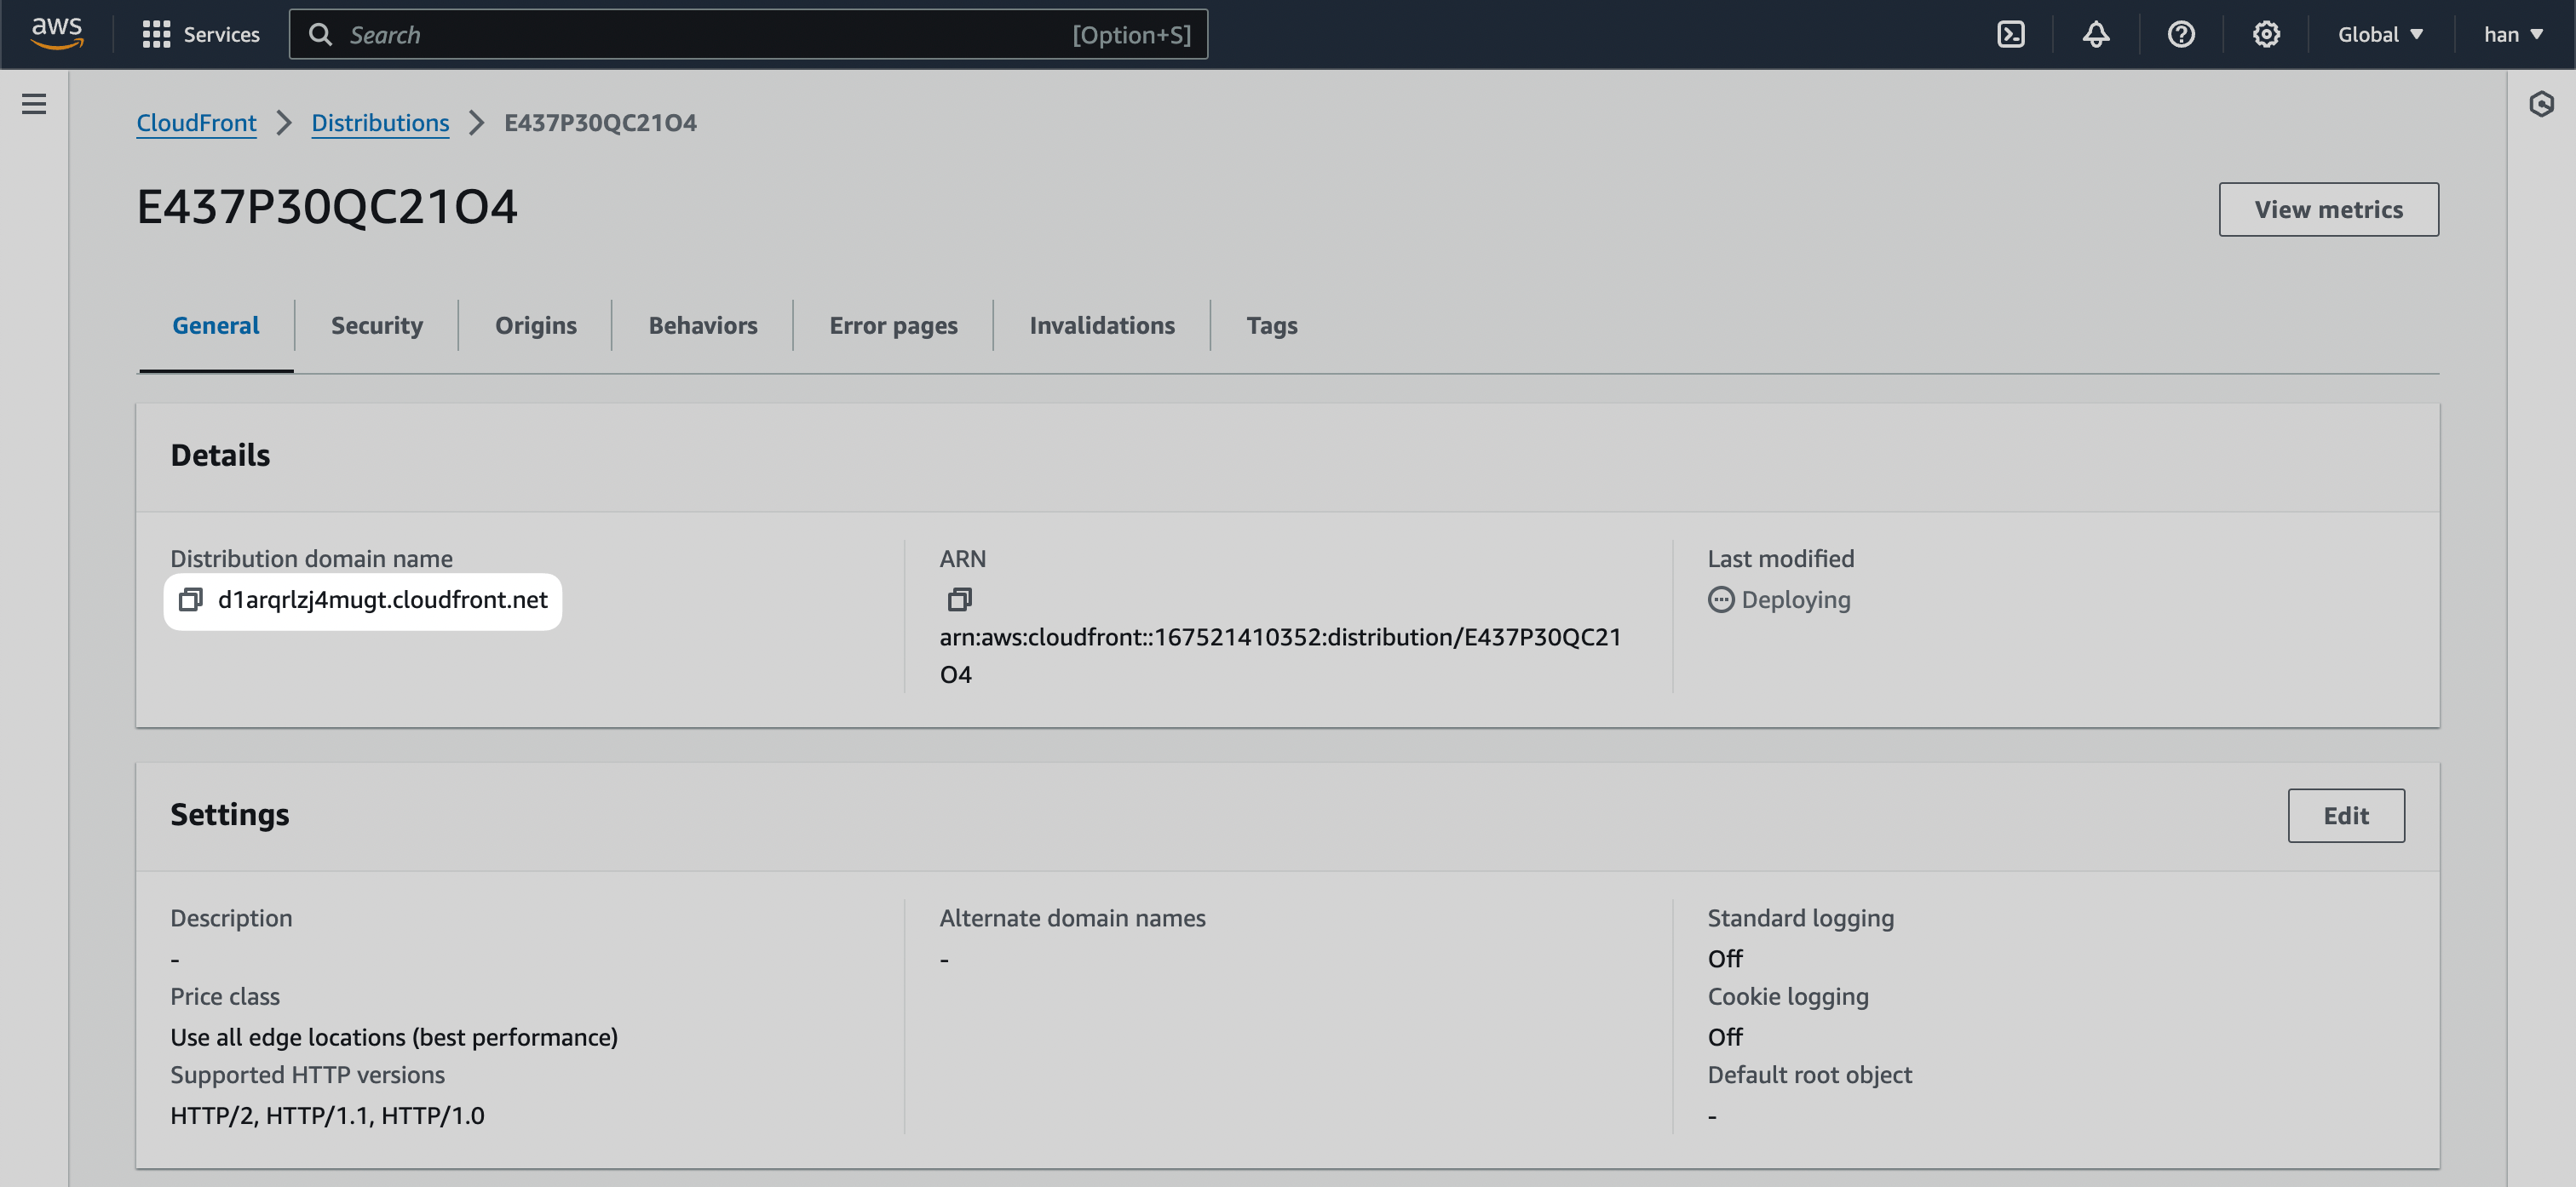 All pages should route to your main landing page. When you append your chosen subpath, for example `/docs`, the URL should serve your Mintlify documentation.
## Connect with Route 53
Next, connect the CloudFront distribution to your primary domain.
For this section, you can also refer to AWS's official guide on [Configuring
Amazon Route 53 to route traffic to a CloudFront
distribution](https://docs.aws.amazon.com/Route53/latest/DeveloperGuide/routing-to-cloudfront-distribution.html#routing-to-cloudfront-distribution-config).
1. Navigate to [Route53](https://aws.amazon.com/route53) inside the AWS console.
2. Navigate to the "Hosted zone" for your primary domain.
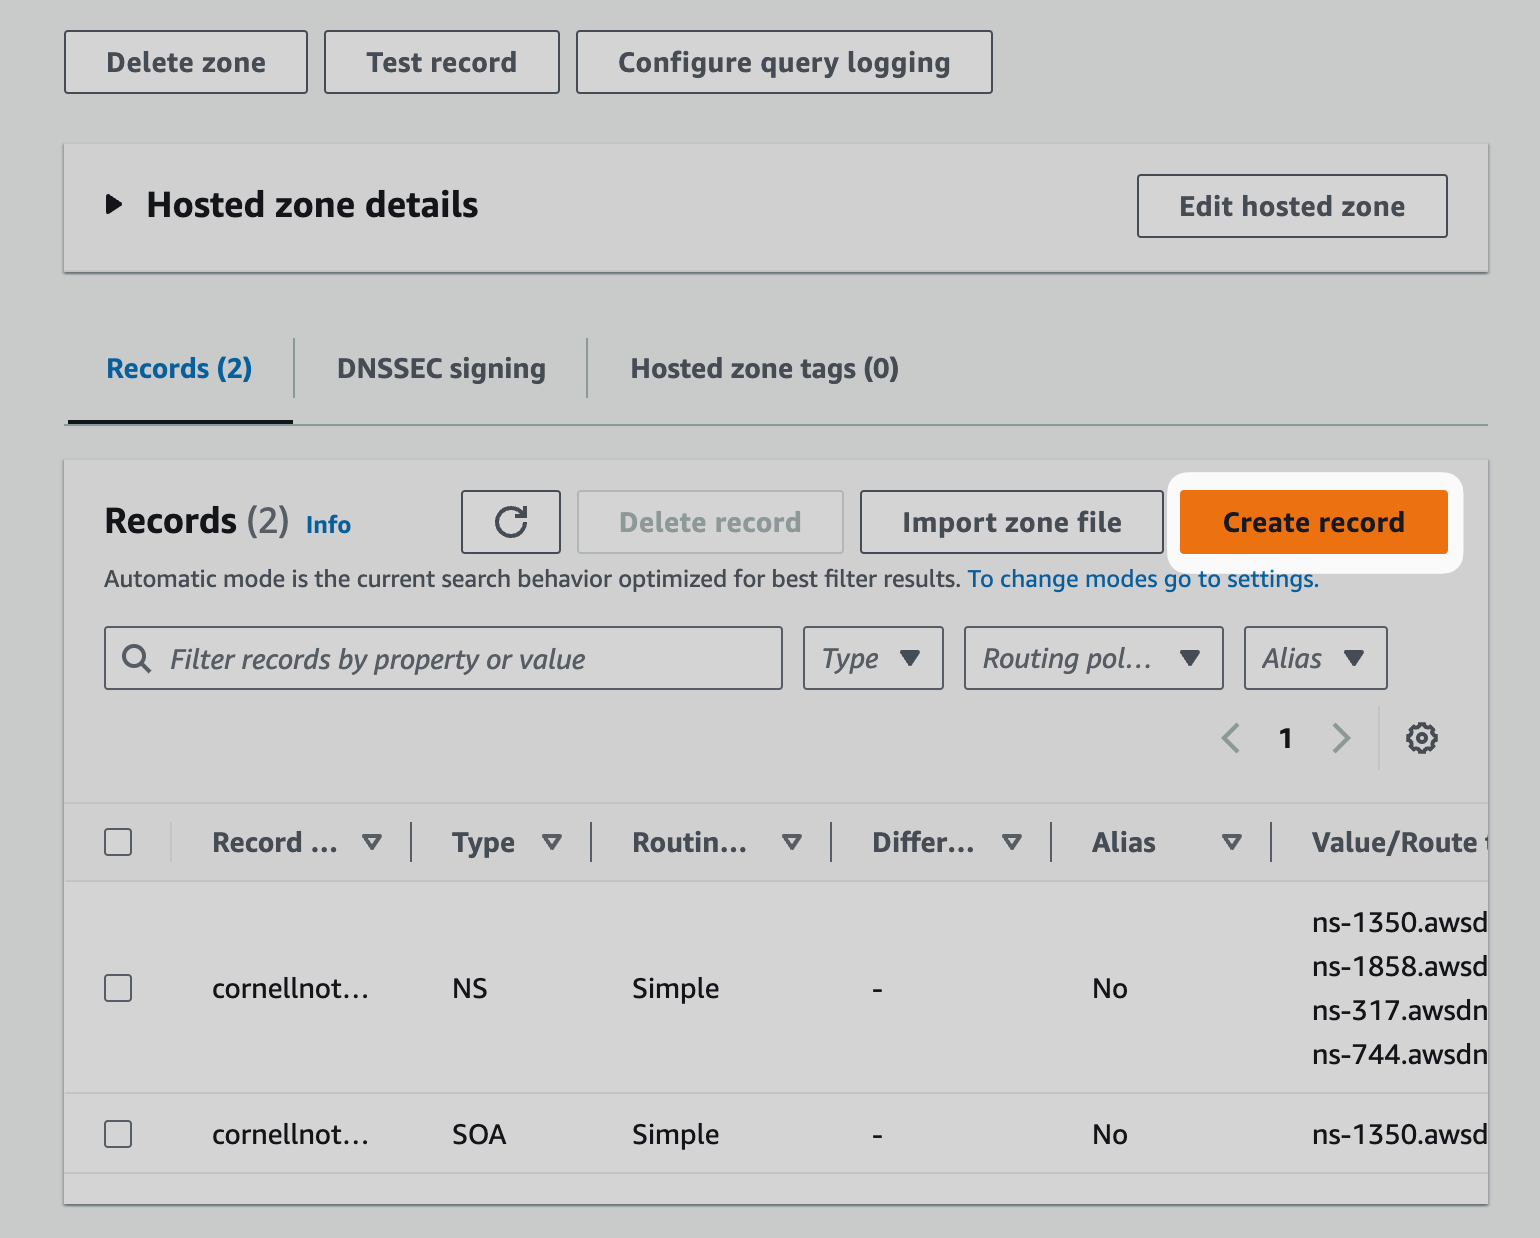
3. Click **Create record**.
All pages should route to your main landing page. When you append your chosen subpath, for example `/docs`, the URL should serve your Mintlify documentation.
## Connect with Route 53
Next, connect the CloudFront distribution to your primary domain.
For this section, you can also refer to AWS's official guide on [Configuring
Amazon Route 53 to route traffic to a CloudFront
distribution](https://docs.aws.amazon.com/Route53/latest/DeveloperGuide/routing-to-cloudfront-distribution.html#routing-to-cloudfront-distribution-config).
1. Navigate to [Route53](https://aws.amazon.com/route53) inside the AWS console.
2. Navigate to the "Hosted zone" for your primary domain.
3. Click **Create record**.
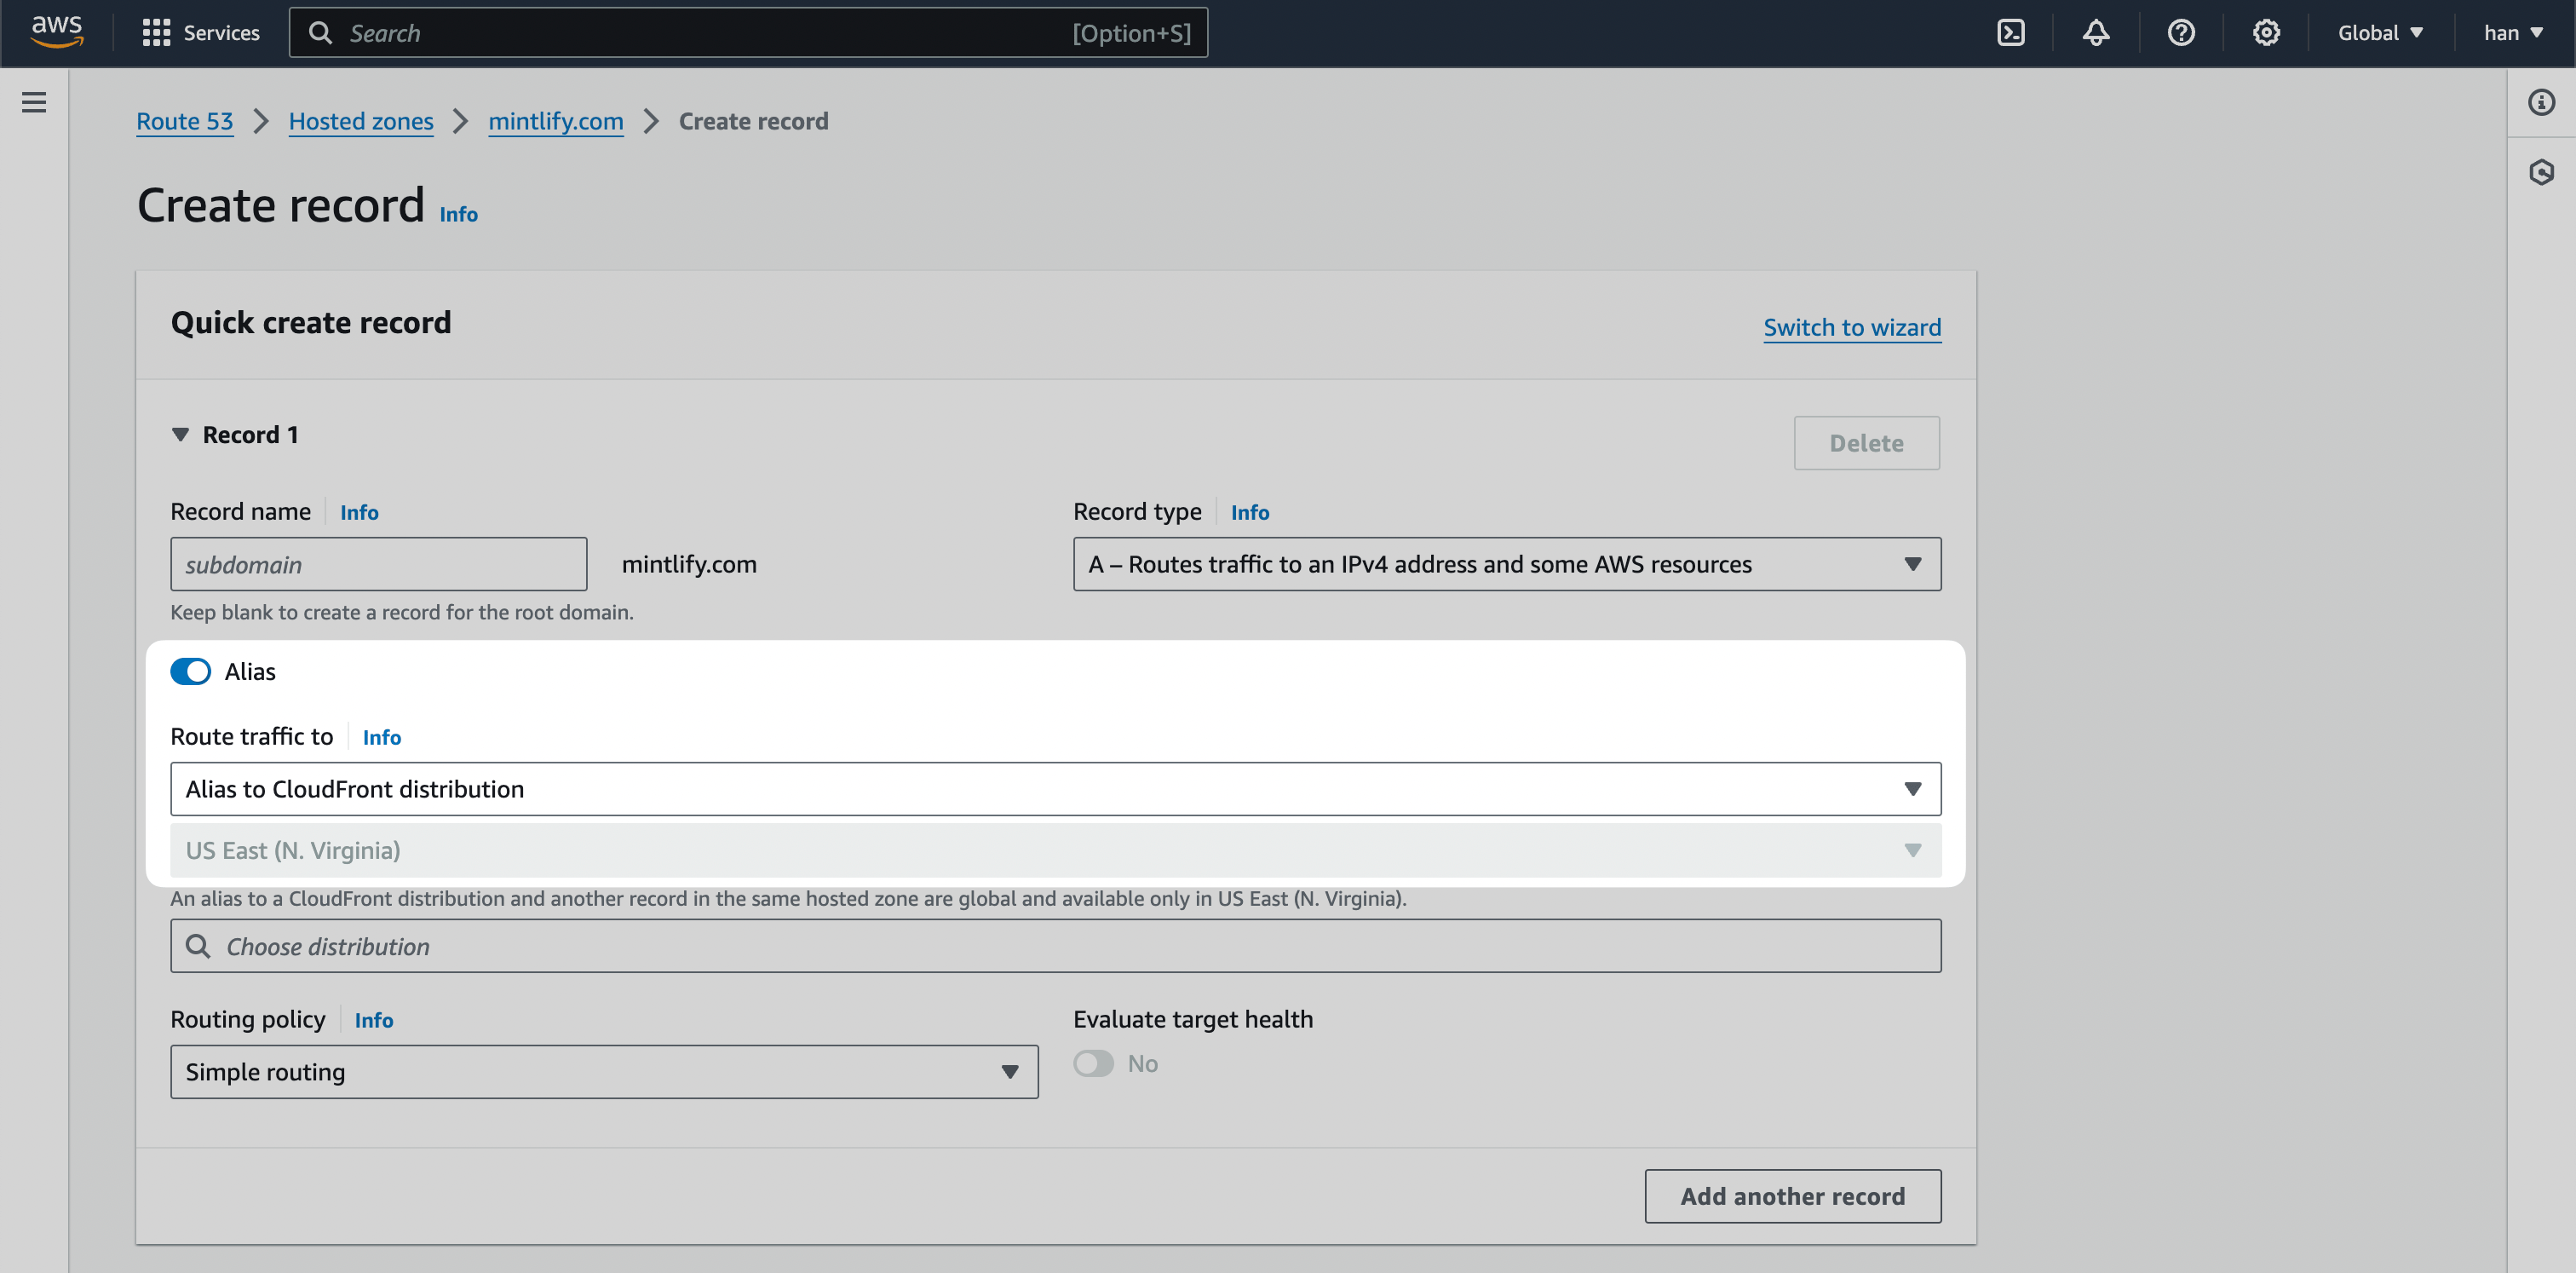
 4. Toggle `Alias` and then **Route traffic to** the `Alias to CloudFront distribution` option.
 5. Click **Create records**.
You may need to remove the existing A record if one currently exists.
Your documentation is now live at your chosen subpath for your primary domain.
After you deploy your changes, your documentation is usually available at your subpath within a few minutes. If your setup includes DNS changes, propagation can take 1-4 hours, and in rare cases up to 48 hours. If your documentation is not immediately available, wait before troubleshooting.
5. Click **Create records**.
You may need to remove the existing A record if one currently exists.
Your documentation is now live at your chosen subpath for your primary domain.
After you deploy your changes, your documentation is usually available at your subpath within a few minutes. If your setup includes DNS changes, propagation can take 1-4 hours, and in rare cases up to 48 hours. If your documentation is not immediately available, wait before troubleshooting.